This page gathers multiple tutorials to quickly familiarize with common Speedment Use Cases. The first two tutorials cover the fundamentals of a Speedment application to lay a foundation on which further knowledge can be obtained in the following tutorials.
Getting Started
Example Applications
- Tutorial 3 - Speedment Spring Boot Integration
- Tutorial 4 - Speedment filters based on Json Web Tokens
- Tutorial 5 - Log errors in a database
- Tutorial 6 - Use Speedment with Java EE
- Tutorial 7 - Create Event Sourced Systems
- Tutorial 8 - Writing Your Own Extensions
Other Guides
Tutorial 1 - Hello Speedment
In this tutorial, we will write a small application that asks for the user’s name and age and persists it in a MySQL database. First off, we will initialize the database.
Step 1: Setup the database
CREATE DATABASE hellospeedment;
USE hellospeedment;
We will also add a table for storing the information.
CREATE TABLE IF NOT EXISTS `user` (
    `id` bigint(20) NOT NULL AUTO_INCREMENT,
    `name` varchar(32) NOT NULL,
    `age` int(5) NOT NULL,
    PRIMARY KEY (`id`),
    UNIQUE KEY `name` (`name`)
) ENGINE=InnoDB DEFAULT CHARSET=utf8 AUTO_INCREMENT=1;
Step 2: Create a new Speedment Maven project
Next, we need to set up a Maven project dependent on Speedment and connect to the newly created database.
Create a custom project starter
Head over to our Initializer to generate a customized pom.xml for your project by filling in your project details.
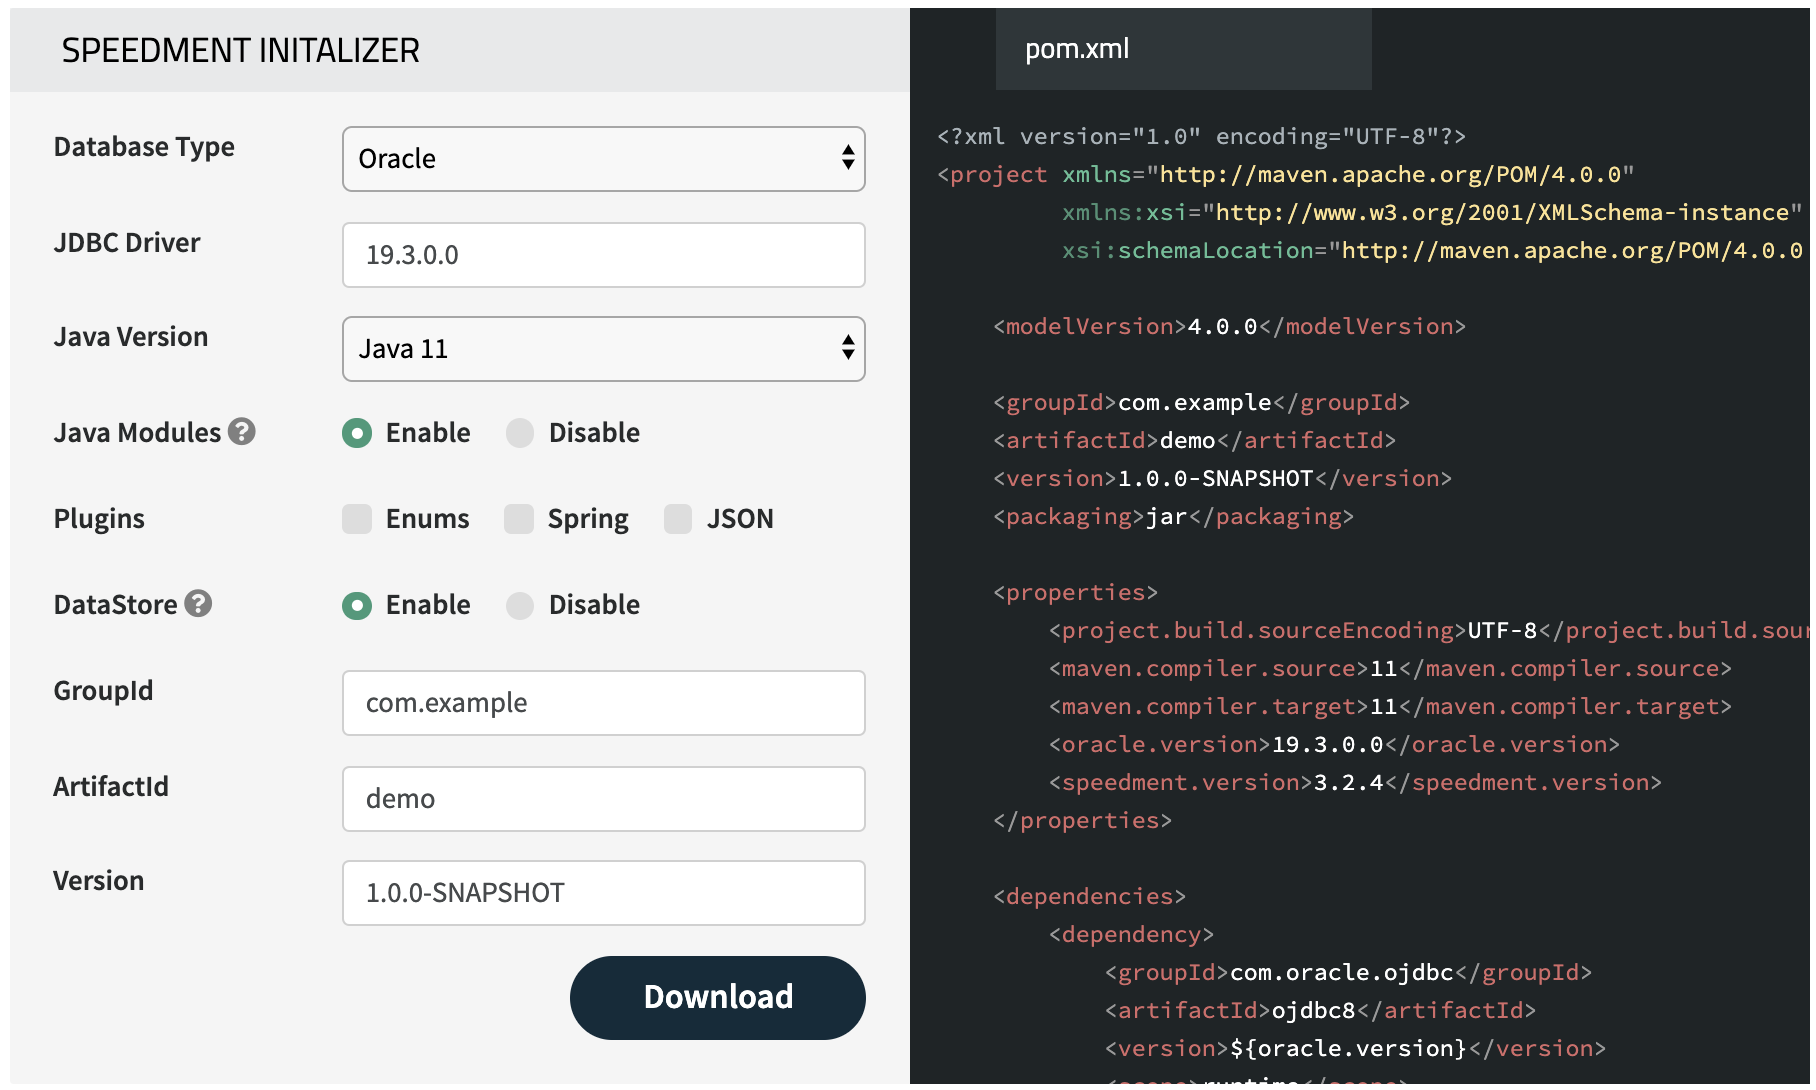
The Initializer is found on www.speedment.com/initializer.
Click the download button to download a zip-file containing the starter project and open this in your IDE as a Maven project.
Two extra important Maven targets will be available, speedment:generate and speedment:tool. generate is used to generate code from an existing .json project file and tool is used to connect to a database and create a JSON-file from that.
Connect to the database
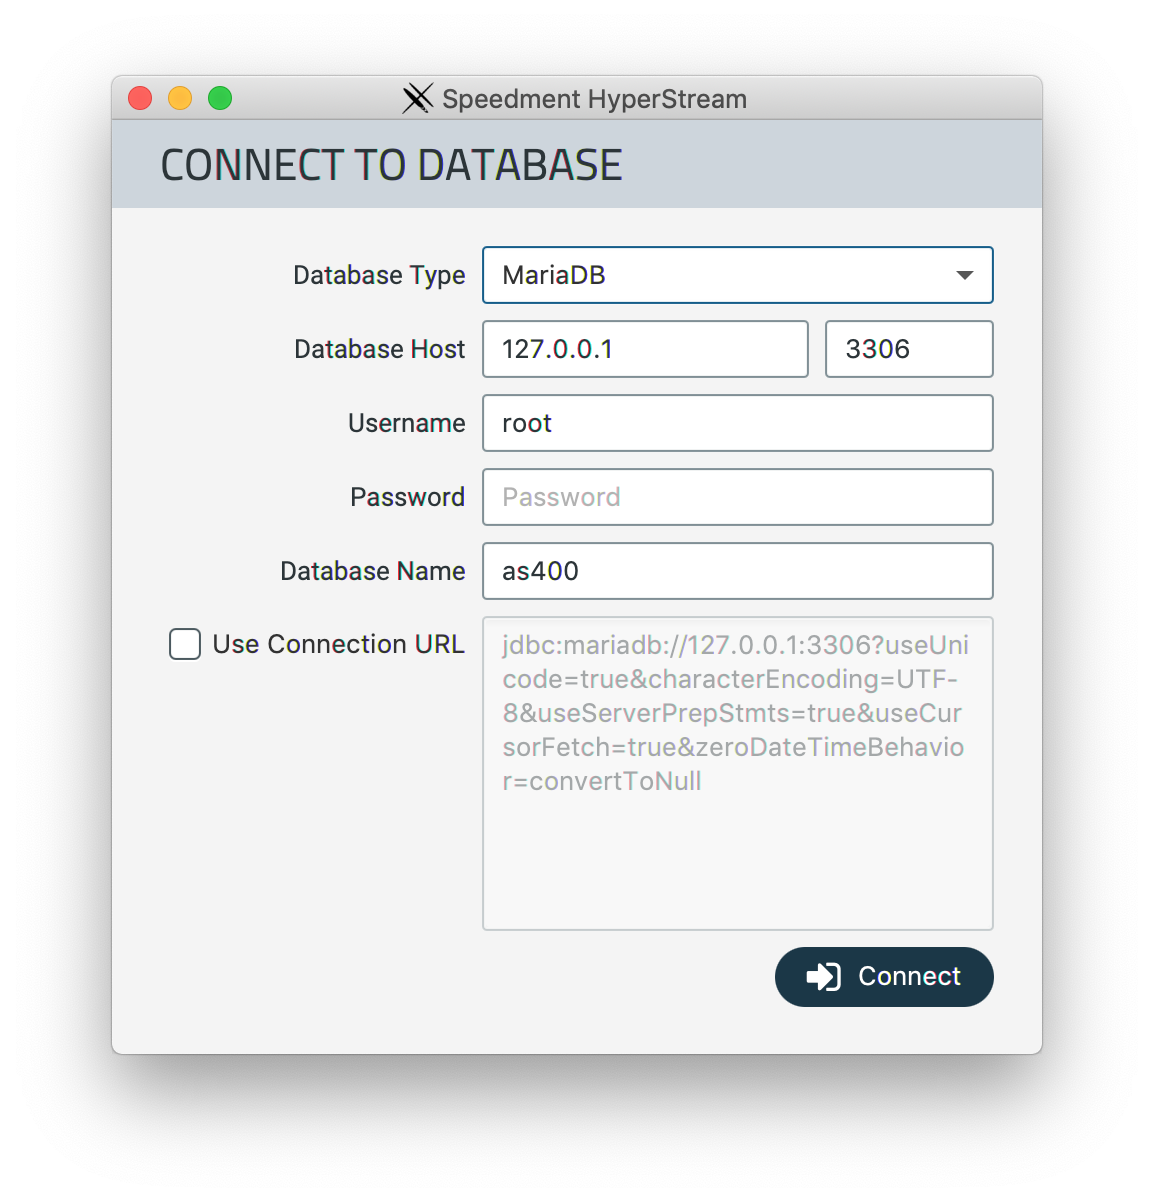
Speedment uses JSON configuration files to generate Java code from your database. The JSON files will be created using the Speedment Tool. This is launched simply by calling mvn speedment:tool in the same directory as your pom.xml or by clicking it in your IDE.
Once started, use the Tool to connect to your database.
Speedment now analyses the underlying data sources’ metadata and automatically creates code which directly reflects the structure (i.e. the “domain model”) of the underlying data sources. All it takes is a simple press on the Generate-button.
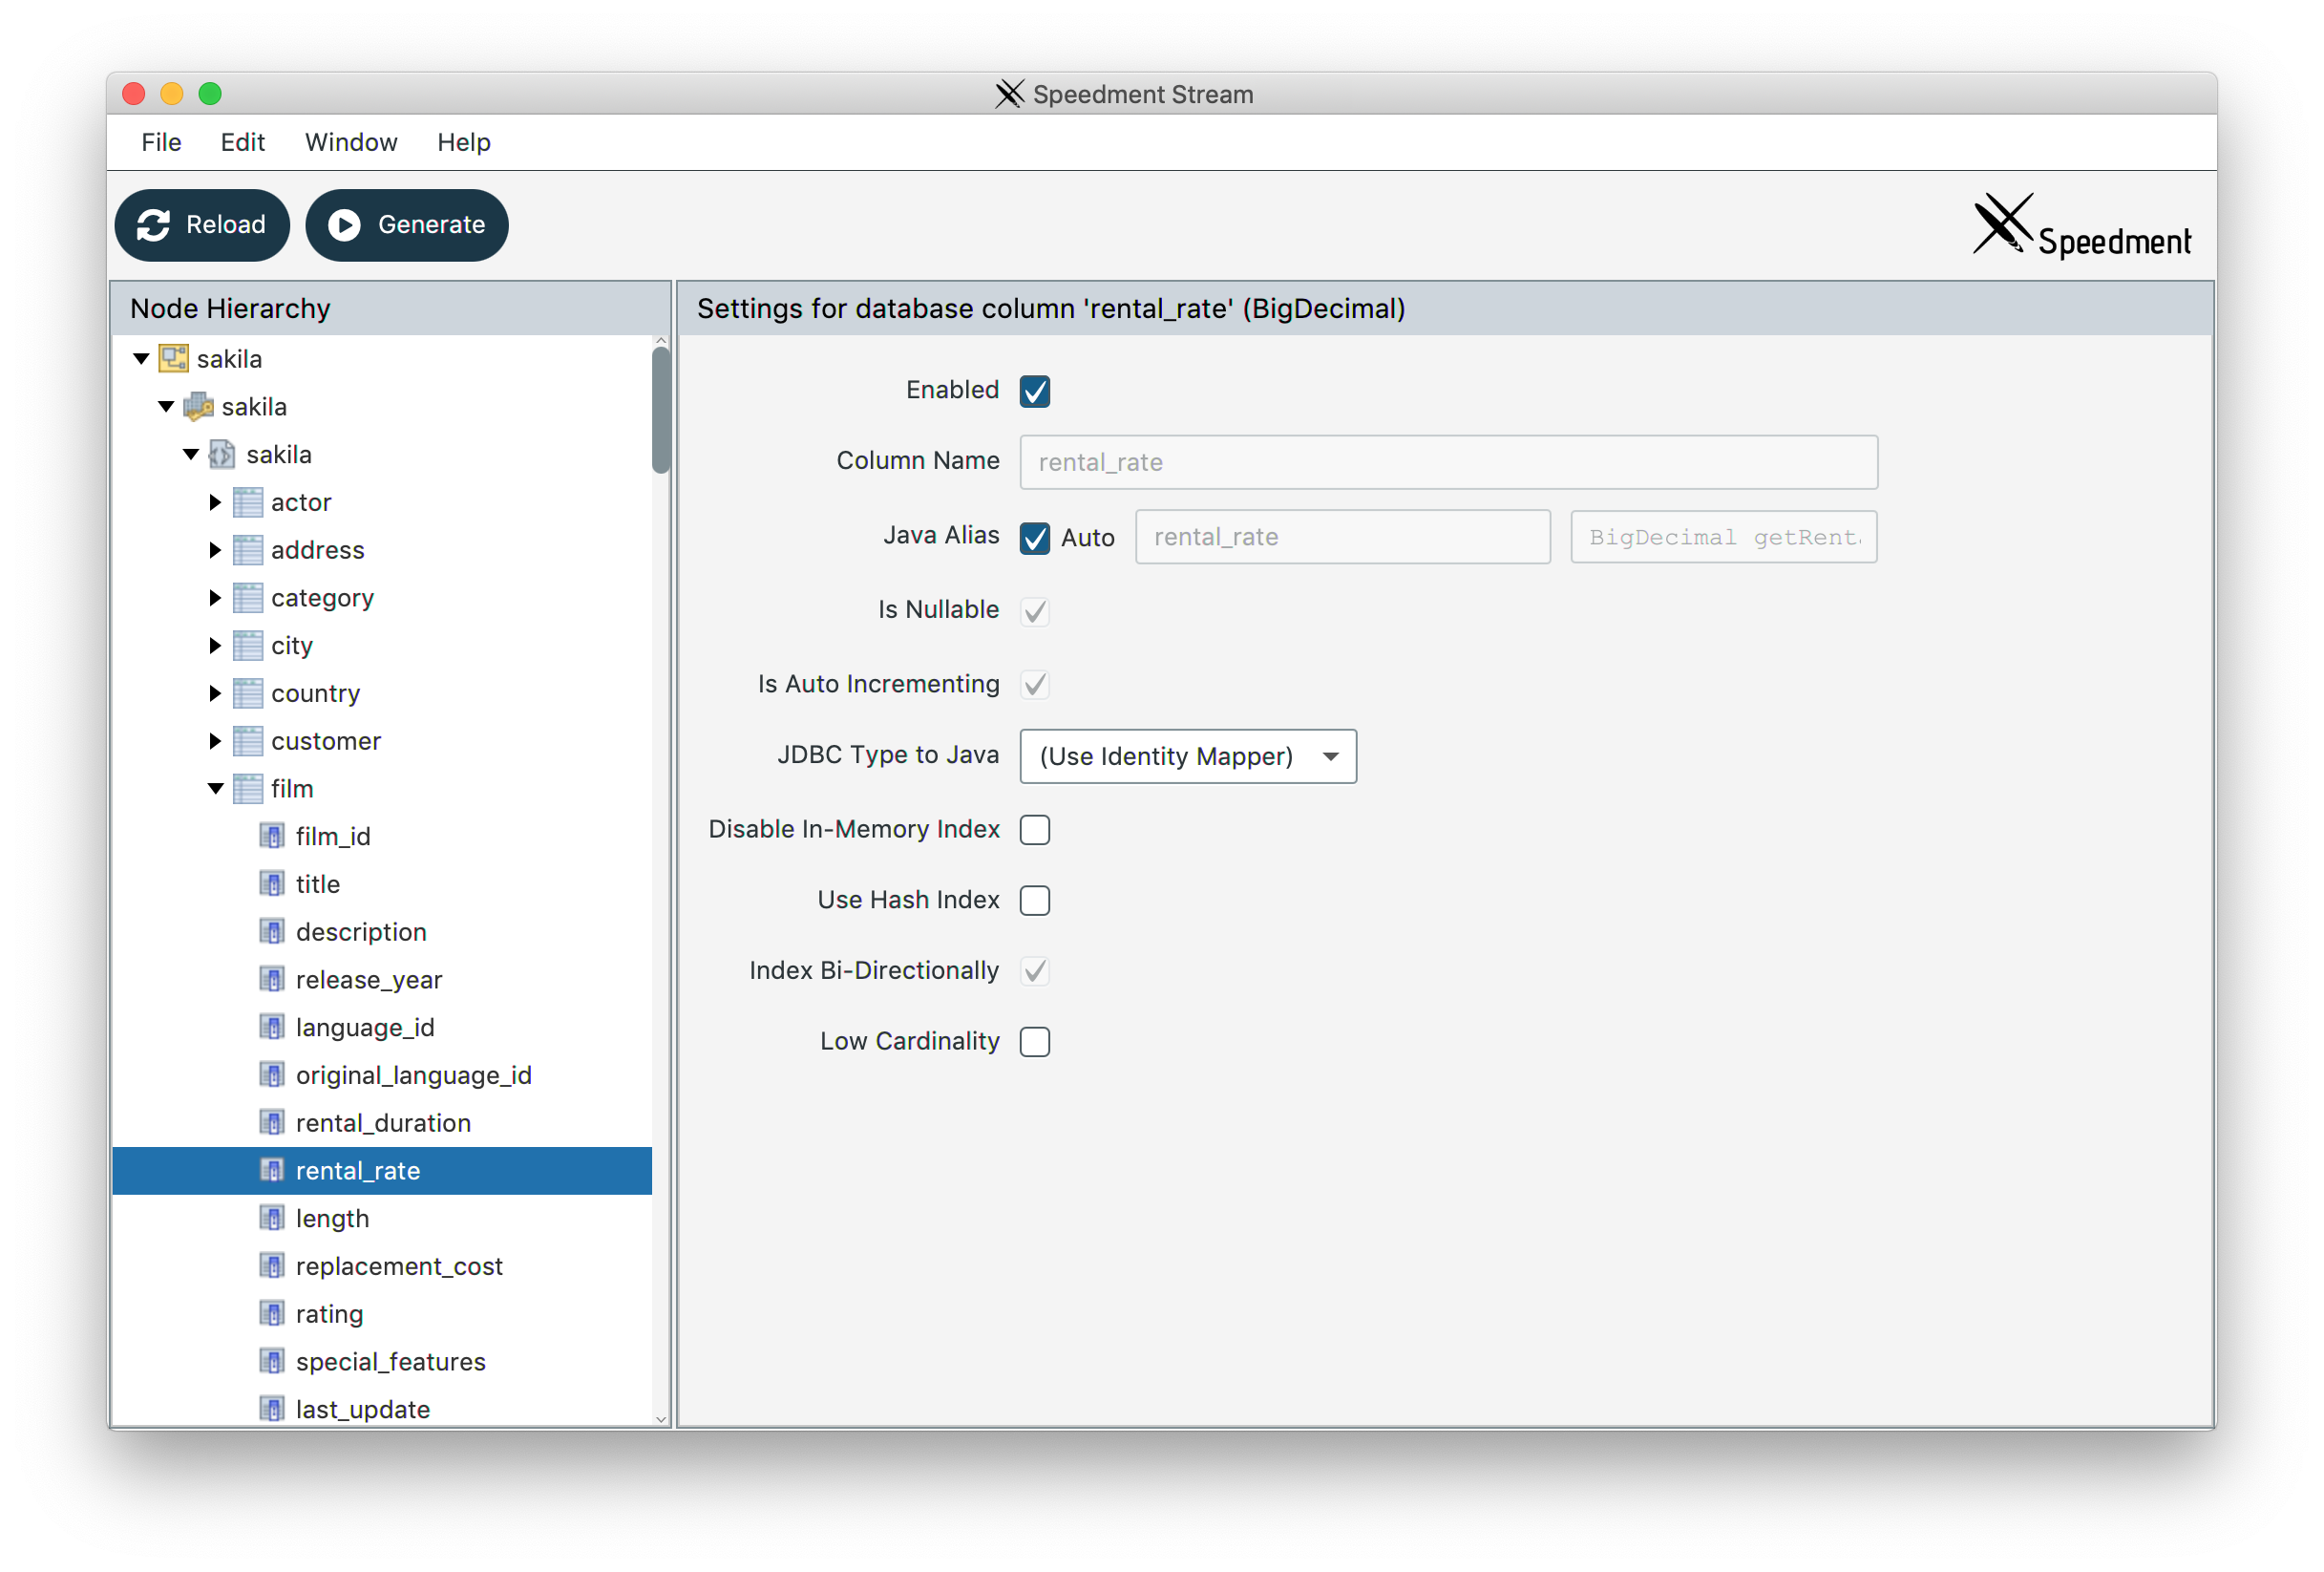
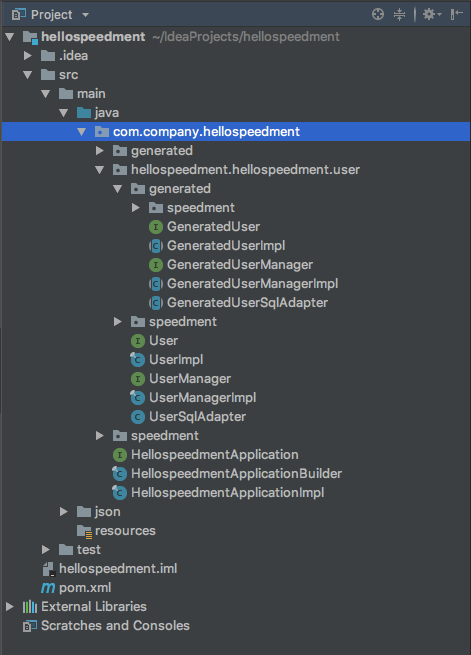
Done! Speedment has generated models for every table in the database! If things worked out correctly, you should have ended up with this structure:
Step 3: Write the application
Now we are ready to write the application. Open the main.java-file that was a part of the project starter and edit it to look like this:
package com.company.speedment.test.hellospeedment;

/**
 *
 * @author Your name
 */
public class Main {
    public static void main(String... params) {
        HellospeedmentApplication app = new HellospeedmentApplicationBuilder()
            .withBundle(MySqlBundle.class)
            .build();
        UserManager users = app.getOrThrow(UserManager.class);
    }
}
In order to tell Speedment what database it will be interacting with, with must add a connector bundle when creating our application instance. This is done by calling withBundle(CONNECTOR_BUNDLE) as shown in the previous example.
Since we are using MySQL, we will be adding the MySqlBundle.
The HellospeedmentApplication-instance is generated automatically by Speedment and will connect to the database and handle all the initialization for you! If you have a password on your MySQL database, you will need to set that manually like this:
HellospeedmentApplication app = new HellospeedmentApplicationBuilder()
    .withBundle(MySqlBundle.class)
    .withPassword("YourSuperSecretPassword")
    .build();
Speedment takes your security seriously and will not store your passwords in any configuration files.
Now we will listen to user input. To do this, we use a Scanner on the standard input channel.
final Scanner scn = new Scanner(System.in);
Using the scanner we can ask the user for a name and an age. We will not check the validity of the input in this tutorial so we just assume the user inputs everything correctly.
System.out.print("What is your name? ");
final String name = scn.nextLine();

System.out.print("What is your age? ");
final int age = scn.nextInt();
Now we want to persist this information to the database. This is done by creating a new entity, setting its values, and calling persist() on it.
users.persist(
    users.create()
        .setName(name)
        .setAge(age)
);
We can also react to the query, printing a message if anything failed. This could for an example happen if the name is already persisted.
try {
    User user = users.create()
        .setName(name)
        .setAge(age);
    user = users.persist(user);
    System.out.print("Hello, " + user.getName() + "!");
} catch (SpeedmentException se) {
   System.out.print("Why are you so persistent?");
   se.printStackTrace();
}
If you want to know exactly what is happening with your persist() command, you can set up the application for logging as follows.
HellospeedmentApplication app = new HellospeedmentApplicationBuilder()
    .withBundle(MySqlBundle.class)
    .withLogging(PERSIST)
    .build();
UserManager users = app.getOrThrow(UserManager.class);

users.persist(
    users.create()
        .setName(name)
        .setAge(age)
);
This might give the following output:
What is your name? John Smith
What is your age? 32
sql = insert into hellospeedment.user(id, name, age) values (?, ?, ?)
params = [null, John Smith, 32]
thowable =
If you enter the same name again you might get this output:
What is your name? John Smith
What is your age? 10
sql = insert into hellospeedment.user(id, name, age) values (?, ?, ?)
params = [null, John Smith, 10]
thowable = Duplicate entry 'John Smith' for key 'name'
Tutorial 2 - A First Stream from Speedment
This tutorial covers some basic stream operations in a Speedment application. The examples are using data from the Sakila film database, which is freely available to download from Oracle.
Step 1: Setup the database
The Sakila database can be downloaded here. Installation instructions are here.
Step 2: Create a new Speedment Maven project
If this is your first time using Speedment, we explain how to set up a new Speedment Maven project in our Quick Start guides Start a New Speedment Maven Project and Connect to Your Database.
Step 3: Write the Application
Previous tutorials describe in detail how to set up a Speedment application. Basically, a simple example boils down to code of the following outline. First the app is built, then the Managers needed for the application logic is fetched from the app and finally, the app is closed when the application logic is completed.
    public static void main(String... params) {
        SakilaApplication app = new SakilaApplicationBuilder()
            .withBundle(MySqlBundle.class)
            .withPassword("MyPassword")
            .build();

        FilmManager films = app.getOrThrow(FilmManager.class);
        ActorManager actors = app.getOrThrow(ActorManager.class);
        FilmActorManager filmActors = app.getOrThrow(FilmActorManager.class);

        // your application logic here

        app.close();
    }
Step 4 Counting the number of items in a stream
As a first application, we count the number of films with the rating PG-13. This is done by filtering the stream with the desired predicate and then counting the items.
        long count = films.stream()
            .filter(Film.RATING.equal("PG-13"))
            .count();

        System.out.format("There are %d PG-13 films in the DB", count);
By adding a logging setting to the application when creating it, we can trace the internal operation of the Speedment runtime. The following application will produce the count of PG-13 films in the database as well as log the SQL operations performed.
    public static void main(String... params) {
        SakilaApplication app = new SakilaApplicationBuilder()
            .withBundle(MySqlBundle.class)
            .withPassword("sakila")
            .withLogging(ApplicationBuilder.LogType.STREAM)
            .build();

        FilmManager films = app.getOrThrow(FilmManager.class);

        long count = films.stream()
            .filter(Film.RATING.equal("PG-13"))
            .count();

        System.out.format("There are %d PG-13 films in the DB", count);

        app.close();
    }
The stream is actually a declarative statement describing a result (the films with rating PG-13) rather than an imperative statement about which operations to perform and in which order. Therefore, the Speedment runtime is free to compute the desired result in any way it sees fit and it turns out that running this piece of code will result in the following SQL query to be executed by the database engine.
SELECT COUNT(*) FROM sakia.film WHERE ('rating'  = 'PG-13' COLLATE utf8_bin)
There are 223 PG-13 films in the DB
Step 5: Basic film lookup via primary key
While the counting of items in the database can be fully delegated to the database engine by Speedment, a typical use case entails in-JVM data operations too. As a first example, consider the following code snippet that finds films using the film ID. Arguably the most basic kind of lookup, the code for accomplishing this task is very straightforward; the stream of films is filtered on ID and then the films of the stream are mapped to the kind of descriptions we are looking for.
        Scanner scn = new Scanner(System.in);
        System.out.println("Please enter Film ID ");
        final int id = Integer.decode(scn.nextLine().trim());

        final Optional<String> title = films.stream()
            .filter(Film.FILM_ID.equal(id))      // find the films we are looking for
            .map(Film.TITLE)                     // switch from a stream of films to one of titles
            .findAny();                          // we want the first and only match for this unique key

        if (title.isPresent()) {
            System.out.format("Film ID %d has title %s.", id, title.get());
        } else {
            System.out.format("Film ID not found.", id);
        }

        app.close();
Proper input validation is left out for clarity.
Step 6: Understanding Stream Optimization
The Speedment runtime framework handles the execution of the Speedment streams and since the stream in the application is a declarative construct the Speedment runtime may optimize the stream in any way it finds useful as long as the final result remains the same.
As an example of such optimization, consider the following code snippet:
long count = films.stream()
    .filter(Film.RATING.equal("PG-13"))
    .filter(Film.LENGTH.greaterOrEqual(75))
    .map(Film.TITLE)
    .sorted()
    .count();

System.out.printf("Found %d films", count);
The result of this stream is a count of items that are filtered by two different predicates, mapped to Strings and finally sorted. The reader probably notes that mapping items from Films to titles of films as well as sorting titles of films will never affect the number of items in the stream. The Speedment runtime will draw the same conclusion and optimize away the sorting and mapping operations, leaving once again all the work to the database engine with a database query along the following lines
SELECT COUNT(*) FROM 'sakila'.'film' WHERE ('rating' = 'PG-13' COLLATE utf8_bin) AND ('length' >= 75)
Clearly, when the stream is built as a single sequence of statements as above, the optimization only helps if the designer of the application creates suboptimal code. However, a non-terminated stream is a logical construct that can be passed around as a parameter so it is quite possible to allow the construction of the structure of a stream to be the result of analysis of input data where some parts are added only when certain conditionals hold. Knowing that the framework will optimize the stream before executing it allows the application designer to focus on functional correctness rather than all execution paths creating optimal streams.
Step 7: Classifying Films
As a more elaborate example, the following code snippet collects the stream of films and group them by rating. This piece of code demonstrates how Speedment gives immediate access to the full versatility and power of Java Streams to any database application.
films.stream()
    .collect(Collectors.groupingBy(Film.RATING,
        Collectors.counting())).forEach(
            (rating, count) -> System.out.printf("There are %d %s rated films.%n", count, rating));
The output looks as follows.
There are 223 PG-13 rated films.
There are 195 R rated films.
There are 210 NC-17 rated films.
There are 178 G rated films.
There are 194 PG-rated films.
Step 8: Film lookup via actor name
A slightly more advanced use case of Speedment streams is to look for films featuring actors of a given last name. To achieve this, the application logic will be split into two parts. First, we compute selectedActorIds, the actors with matching names. Then we filter the relation between films and actors in the actor IDs in question and finally map the items of the stream into the desired output format.
    System.out.println("Please enter actor last name ");
    final String actorName = scn.nextLine().trim();
    Set<Integer> selectedActorIds = actors.stream()
        .filter(Actor.LAST_NAME.equalIgnoreCase(actorName))
        .mapToInt(Actor.ACTOR_ID)                             // turning the stream into a stream of actor IDs
        .boxed()                                              // turning IntStream into Stream<Integer>
        .collect(toSet());

    if (selectedActorIds.isEmpty()) {
        System.out.println("No actor with last name " + actorName + " found.");
    } else {
        System.out.println("Films with actor with last name " + actorName + ":");
        filmActors.stream()
            .filter(FilmActor.ACTOR_ID.in(selectedActorIds))
            .map(films.finderBy(FilmActor.FILM_ID))  // the stream of films we are looking for
            .map(Film.TITLE.getter())                // the stream of film titles
            .sorted()
            .forEach(title -> System.out.println(" " + title));
    }
Example output
The following is an example output from the application, where we look for Film ID 14 and then films featuring an actor names Akroyd.
Please enter Film ID
14

Film ID 14 has title ALICE FANTASIA
Please enter actor last name
Akroyd

Films with an actor with last name Akroyd:
 APOLLO TEEN
 BACKLASH UNDEFEATED
 BETRAYED REAR
 ...
Tutorial 3 - Speedment Spring Boot Integration
Having covered basic Speedment code generation and application logic in previous tutorials, this tutorial builds on that knowledge to showcase how to create a REST API to a Speedment application using Spring Boot.
Step 1: Setup the database
The Sakila database can be downloaded here. Installation instructions are here.
Step 2: Create a new Maven project
As in previous tutorials, create a new Java 8 Maven project and the Speedment dependencies to the pom.xml-file. For this tutorial, we also add the Spring Boot framework dependencies. In the following, we assume a MySQL database since the Sakila database linked above is MySQL.
<parent>
    <groupId>org.springframework.boot</groupId>
    <artifactId>spring-boot-starter-parent</artifactId>
    <version>2.2.0.RELEASE</version>
</parent>

<build>
    <plugins>
        ...
        <plugin>
            <groupId>com.speedment</groupId>
            <artifactId>speedment-maven-plugin</artifactId>
            <version>3.2.5</version>
        </plugin>
        <plugin>
            <groupId>org.springframework.boot</groupId>
            <artifactId>spring-boot-maven-plugin</artifactId>
        </plugin>
        ...
    </plugins>
</build>
<dependencies>
    ...
    <dependency>
        <groupId>com.speedment</groupId>
        <artifactId>runtime</artifactId>
        <version>3.2.5</version>
        <type>pom</type>
    </dependency>
    <dependency>
        <groupId>mysql</groupId>
        <artifactId>mysql-connector-java</artifactId>
        <version>Z5.1.46</version>
    </dependency>
    <dependency>
        <groupId>org.springframework.boot</groupId>
        <artifactId>spring-boot-starter-web</artifactId>
    </dependency>
    <dependency>
        <groupId>com.fasterxml.jackson.datatype</groupId>
        <artifactId>jackson-datatype-jdk8</artifactId>
    </dependency>
    ...
</dependencies>
Step 3: Spring integration
The starting point of a Spring Boot based application is the SpringApplication.run method. The following main class is all that is needed to bootstrap the application.
@SpringBootApplication
public class Main {
    public static void main(String[] args) throws UnsupportedEncodingException, FileNotFoundException {
        SpringApplication.run(Main.class, args);
    }
}
To add any meaningful functionality to the application, we start out with creating the RestController. Using Spring annotations, we declare a class that will manage the server side of the REST endpoints for films. The controller defines four different endpoints; the list of all films (/), film lookup by ID (/{id}), film lookup via any actor having a given name (/byactor/{actorName}), film lookup grouped on actor names (/byactors/{actorName}) and filtered on an actor name part.
@RestController
@RequestMapping("/film")
public class FilmsController {
    private final Logger logger = LoggerFactory.getLogger(this.getClass());

    private final FilmActorManager filmActors;
    private final ActorManager actors;
    private final FilmManager films;

    public FilmsController(SakilaApplication app) {
        films = app.getOrThrow(FilmManager.class);
        filmActors = app.getOrThrow(FilmActorManager.class);
        actors = app.getOrThrow(ActorManager.class);
    }

    @GetMapping("")
    List<Film> getFilms() {
        return films.stream().collect(toList());
    }

    @GetMapping("{id}")
    Film getFilmById(@PathVariable int id) {
        return films.stream().filter(Film.FILM_ID.equal(id)).findAny().orElse(null);
    }

    @GetMapping("byactor/{actorName}")
    List<Film> getFilmByActor(@PathVariable String actorName) {
        Integer actorId = actors.stream()
                .filter(Actor.LAST_NAME.equalIgnoreCase(actorName))
                .mapToInt(Actor.ACTOR_ID)
                .boxed()
                .findAny()
                .orElse(null);

        return actorId == null ? emptyList() : filmActors.stream()
                .filter(FilmActor.ACTOR_ID.equal(actorId))
                .map(films.finderBy(FilmActor.FILM_ID))
                .collect(toList());
    }

    @GetMapping("byactors/{actorName}")
    Map<String, List<String>> getFilmByActors(@PathVariable String actorName) {
        Set<Integer> actorIds = actors.stream()
                .filter(Actor.LAST_NAME.containsIgnoreCase(actorName)
                    .or(Actor.FIRST_NAME.containsIgnoreCase(actorName)))
                .mapToInt(Actor.ACTOR_ID)
                .distinct()
                .boxed()
                .collect(toSet());

        return actorIds.isEmpty() ? Collections.EMPTY_MAP : filmActors.stream()
                .filter(FilmActor.ACTOR_ID.in(actorIds))
                .collect(
                        groupingBy(actors.finderBy(FilmActor.ACTOR_ID)
                                .andThen(a -> a.getFirstName() + " " + a.getLastName()),
                                mapping(
                                        films.finderBy(FilmActor.FILM_ID)
                                            .andThen(GeneratedFilm::getTitle),
                                        toList()
                                )
                        )
                );
    }
}
As seen in the constructor of the controller, it relies on an instantiated Speedment SakilaApplication. Without any further instructions on how to do so, the Spring framework would try to instantiate such an object before creating the controller. As seen in previous tutorials, the Speedment application is created using a builder pattern and in order to tell Spring how to do that we create a configuration class. In the configuration class, we also supply a JSON formatting builder which will be used by Spring when JSON encoding the returned data structures from the controller class above. The application would work without it, but adding a formatter allows us to customize the formatting and for this tutorial, we want indented JSON.
@Configuration
public class Setup {
    @Bean
    public SakilaApplication createApplication() {
        return new SakilaApplicationBuilder()
                .withBundle(MySqlBundle.class)
                .withPassword("MyPassword")
                .build();
    }

    @Bean
    public Jackson2ObjectMapperBuilder jacksonBuilder() {
        return new Jackson2ObjectMapperBuilder().indentOutput(true);
    }
}
Having a Main-method as an executional starting point, a Controller for the logic behind the REST API and a Configuration class for setting things up, everything is provided for Spring to determine runtime dependencies and start an HTTP server that exposes our API to clients.
Example output
Querying for a single film by its ID can be done as follows.
curl http://localhost:8080/film/14

{
  "filmId": 14,
  "title": "ALICE FANTASIA",
  "description": "A Emotional Drama of a A Shark And a Database Administrator who must Vanquish a Pioneer in Soviet Georgia",
  "releaseYear": "2006-01-01",
  "languageId": 1,
  "originalLanguageId": null,
  "rentalDuration": 6,
  "rentalRate": 0.99,
  "length": 94,
  "replacementCost": 23.99,
  "rating": "NC-17",
  "specialFeatures": "Trailers,Deleted Scenes,Behind the Scenes",
  "lastUpdate": 1139979822000
}
Asking for all films featuring an actor with the last name Ball will yield a long list of films which we here abbreviate by means of greping for the film titles.
curl -s http://localhost:8080/film/byactor/ball | grep title
  "title" : "ALONE TRIP",
  "title" : "ANGELS LIFE",
  "title" : "ANTITRUST TOMATOES",
  "title" : "BALLOON HOMEWARD",
  "title" : "BINGO TALENTED",
  "title" : "BIRDCAGE CASPER",
  "title" : "BRIGHT ENCOUNTERS",
  "title" : "CABIN FLASH",
  "title" : "CAT CONEHEADS",
  "title" : "COMANCHEROS ENEMY",
  "title" : "DESERT POSEIDON",
  "title" : "DESPERATE TRAINSPOTTING",
  "title" : "EXTRAORDINARY CONQUERER",
  "title" : "GHOST GROUNDHOG",
  "title" : "GREEDY ROOTS",
  "title" : "HILLS NEIGHBORS",
  "title" : "HOTEL HAPPINESS",
  "title" : "HUNTER ALTER",
  "title" : "JADE BUNCH",
  "title" : "KING EVOLUTION",
  "title" : "LOVERBOY ATTACKS",
  "title" : "MAGNIFICENT CHITTY",
  "title" : "MASK PEACH",
  "title" : "NATURAL STOCK",
  "title" : "NONE SPIKING",
  "title" : "PATRIOT ROMAN",
  "title" : "PERDITION FARGO",
  "title" : "SCARFACE BANG",
  "title" : "SENSE GREEK",
  "title" : "TRAMP OTHERS",
  "title" : "TROUBLE DATE",
  "title" : "UNFAITHFUL KILL",
  "title" : "WIND PHANTOM",
The output from the lookup of films by several actors is briefer, so for example, listing the films of actors called Aykroyd yields the following result where each list of films has been truncated for readability.
curl -s http://localhost:8080/film/byactors/Akroyd

{
  "KIRSTEN AKROYD" : [ "BOULEVARD MOB", "BRAVEHEART HUMAN", "BUCKET BROTHERHOOD", ... ],
  "DEBBIE AKROYD" : [ "APOLLO TEEN", "CLUB GRAFFITI", "FAMILY SWEET", ... ],
  "CHRISTIAN AKROYD" : [ "BACKLASH UNDEFEATED", "BETRAYED REAR", "CAPER MOTIONS", ... ]
}
Tutorial 4 - Speedment filters based on Json Web Tokens
Having covered Speedment application setup and creating a REST API using Spring Boot in previous tutorials, this tutorial will describe how to add JWT integration allowing query results to be affected by the contents of JSON Web Tokens supplied from the client.
Added Dependencies for JWTs and Authentication
Starting from the the last tutorial, a REST API to the Sakila movie database, we will use spring-boot-starter-security to add authentication and standard libraries for handling JSON Web Tokens. The following is needed in the pom.xml file to achieve that.
        <dependency>
            <groupId>org.springframework.boot</groupId>
            <artifactId>spring-boot-starter-security</artifactId>
        </dependency>

        <dependency>
            <groupId>io.jsonwebtoken</groupId>
            <artifactId>jjwt</artifactId>
            <version>0.9.1</version>
        </dependency>

        <dependency>
            <groupId>com.fasterxml.jackson.datatype</groupId>
            <artifactId>jackson-datatype-jdk8</artifactId>
        </dependency>
This gives our application access to all algorithms needed to handle the logic of this tutorial. What we need to add is some pieces of code putting it all together and we will see how nicely the solution integrated with Speedment.
Configuring the Authentication
We need a class counting the specific logic for authentication of our application as follows.
@Configuration
@EnableWebSecurity
public class WebSecurityConfig extends WebSecurityConfigurerAdapter {
    @Override
    protected void configure(HttpSecurity http) throws Exception {
        http.csrf().disable().authorizeRequests()
                .antMatchers("/").permitAll()
                .antMatchers(HttpMethod.POST, "/login").permitAll()
                .anyRequest().authenticated()
                .and()
                .addFilterBefore(new JWTLoginFilter("/login", authenticationManager()),
                        UsernamePasswordAuthenticationFilter.class)
                .addFilterBefore(new JWTAuthenticationFilter(),
                        UsernamePasswordAuthenticationFilter.class);
    }

    @Override
    protected void configure(AuthenticationManagerBuilder auth) throws Exception {
        auth.inMemoryAuthentication()
                .withUser("needforspeed")
                .password("pwd")
                .authorities("PG-13", "PG-15");
    }
}
We add filters to allow access to the /login path for all, add a login filter for said path and a JWT checking filter for all others. The logic is that an original request for /login is always allowed and will be used to return a JWT header which the client will send back in subsequent requests, which can then be authenticated by checking the signature of the JWT.
In configure we create a user which i authorized to see films that are rated precisely PG-13 or PG-15 (but is blocked from too childish content). These authorities will be added to the JWT when logging in to be used to filter the results of subsequent film lookups.
Token Authentication
The following code creates, signs, parses and validates the JWTs used.
class TokenAuthenticator {
    private static final long EXPIRATION_TIME = 7 * 24 * 60 * 60 * 1000;  // 7 days
    private static final String AUTH_HEADER_STRING = "Authorization";
    private static final String TOKEN_PREFIX = "Bearer";
    private static final String SECRET = "OurSecret";
    private static final String PG_CLAIM_LABEL = "PG";

    static void addAuthentication(HttpServletResponse res, String userName, Collection<String> autorizations) {

        List<String> pgRatings = autorizations.stream()
                .filter(s -> s.startsWith(PG_CLAIM_LABEL))
                .collect(Collectors.toList());

        String jwt = Jwts.builder()
                .setSubject(userName)
                .claim(PG_CLAIM_LABEL, pgRatings)
                .setExpiration(new Date(System.currentTimeMillis() + EXPIRATION_TIME))
                .signWith(SignatureAlgorithm.HS512, SECRET)
                .compact();

        res.addHeader(AUTH_HEADER_STRING, TOKEN_PREFIX + " " + jwt);
    }

    static Authentication getAuthentication(HttpServletRequest request) {
        String token = request.getHeader(AUTH_HEADER_STRING);
        if (token != null) {
            Jws<Claims> claims = Jwts.parser()
                    .setSigningKey(SECRET)
                    .parseClaimsJws(token.replace(TOKEN_PREFIX, ""));

            Claims body = claims.getBody();
            String userName = body.getSubject();

            final Collection<String> pgStrings = (Collection<String>) body.get(PG_CLAIM_LABEL);
            final Set<String> credentials = unmodifiableSet(new HashSet<>(pgStrings));
            return userName != null ?
                    new UsernamePasswordAuthenticationToken(userName, credentials, emptyList()) :
                    null;
        }
        return null;
    }
}
The method addAuthentication(...) creates and signs a JWT that has a subject containing the username and claims of PG rating allowed for the user in question and the method getAuthentication(HttpServletRequest request) parses the JWT of the headers of an incoming request
Filters to Connect the Logic to the Request Handlers
The following filter parses the JWT from the headers of an incoming request:
public class JWTAuthenticationFilter extends GenericFilterBean {

    @Override
    public void doFilter(ServletRequest request,
                         ServletResponse response,
                         FilterChain filterChain)
            throws IOException, ServletException {
        Authentication authentication = TokenAuthenticator.getAuthentication((HttpServletRequest)request);

        SecurityContextHolder.getContext()
                .setAuthentication(authentication);

        filterChain.doFilter(request,response);
    }
}
… while the login is hooked into the request handling by the following filter.
public class JWTLoginFilter extends AbstractAuthenticationProcessingFilter {

    public JWTLoginFilter(String url, AuthenticationManager authManager) {
        super(new AntPathRequestMatcher(url));
        setAuthenticationManager(authManager);
    }

    @Override
    public Authentication attemptAuthentication(
            HttpServletRequest req, HttpServletResponse res)
            throws AuthenticationException, IOException, ServletException {

        AccountCredentials creds = new ObjectMapper().readValue(req.getInputStream(), AccountCredentials.class);

        return getAuthenticationManager().authenticate(
                new UsernamePasswordAuthenticationToken(
                        creds.getUsername(),
                        creds.getPassword(),
                        Collections.emptyList()
                )
        );
    }

    @Override
    protected void successfulAuthentication(
            HttpServletRequest req,
            HttpServletResponse res, FilterChain chain,
            Authentication auth) throws IOException, ServletException {
        List<String> pgRating = auth.getAuthorities().stream()
                .map(GrantedAuthority::getAuthority)
                .collect(Collectors.toList());
        TokenAuthenticator.addAuthentication(res, auth.getName(), pgRating);
    }
}
The referred class AccountCredentials is just a POJO with username and password to make POST body parsing simple.
public class AccountCredentials {
    private String username;
    private String password;

    // getters and setters...
}
Connect the JWT to Speedment Filters
Now we have all the application logic to allow for login and authenticated requests. To filter the Sakila movie database lookups from the last tutorial all the application logic has to do is to look for the PG rating credentials of the logged in user.
The root request for all films can be changed from
    @GetMapping("")
    List<Film> getFilms() {
        return films.stream().collect(toList());
    }
to
    @GetMapping("")
    List<Film> getFilms() {
        return getFilmStream().collect(toList());
    }

    private Set<String> getCredentials() {
        return (Set<String>) SecurityContextHolder.getContext().getAuthentication().getCredentials();
    }

    private Stream<Film> getFilmStream() {
        return films.stream().filter(Film.RATING.in(getCredentials()));
    }
where instead of operating on the raw stream, we use a filtered stream of films with matching PG rating.
For the other more complicated requests, all we need to do is filter the stream of films by a statement as follows
.filter(Film.RATING.in(credentials))
The return statement of getting films by actor name thus changes from
        return actorId == null ? emptyList() : filmActors.stream()
                .filter(FilmActor.ACTOR_ID.equal(actorId))
                .map(films.finderBy(FilmActor.FILM_ID))
                .collect(toList());
to
        Set<String> credentials = getCredentials();
        return actorId == null ? emptyList() : filmActors.stream()
                .filter(FilmActor.ACTOR_ID.equal(actorId))
                .map(films.finderBy(FilmActor.FILM_ID))
                .filter(Film.RATING.in(credentials))
                .collect(toList());
Using the Application
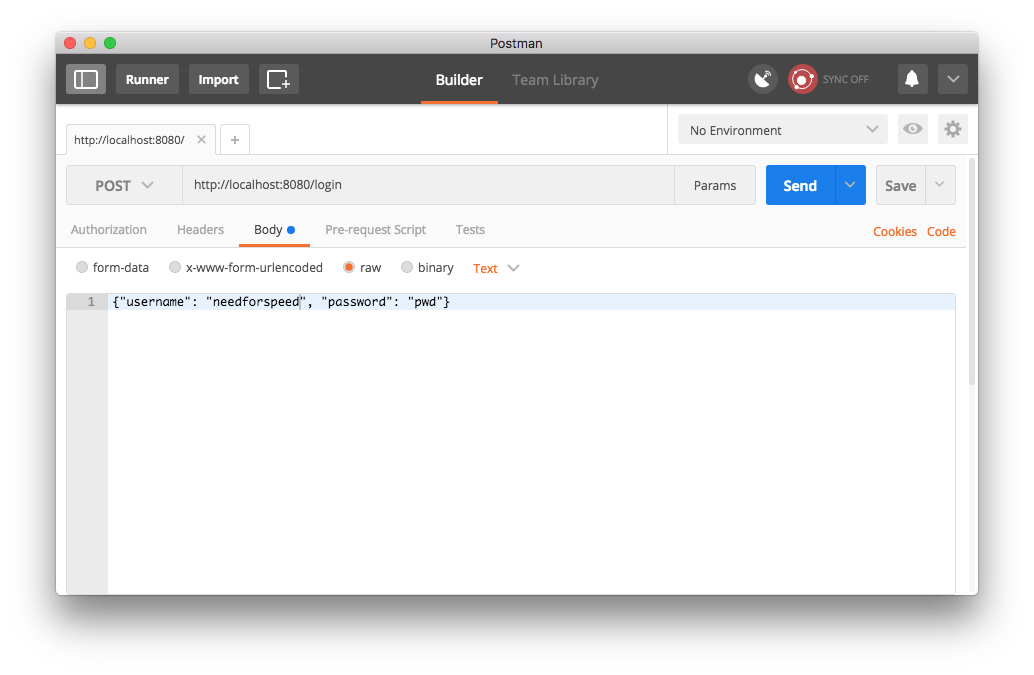
To test run the JWT functionality a tool such as Postman is highly valuable. In the following, we will show how to log in and post requests using the tool to inspect and set JWTs in the same way a browser would do.
First, we log in using a POST method as follows:
and get a JWT in response in the Authorization header. The header value starts with the string “Bearer” followed by the actual JWT returned by our server.
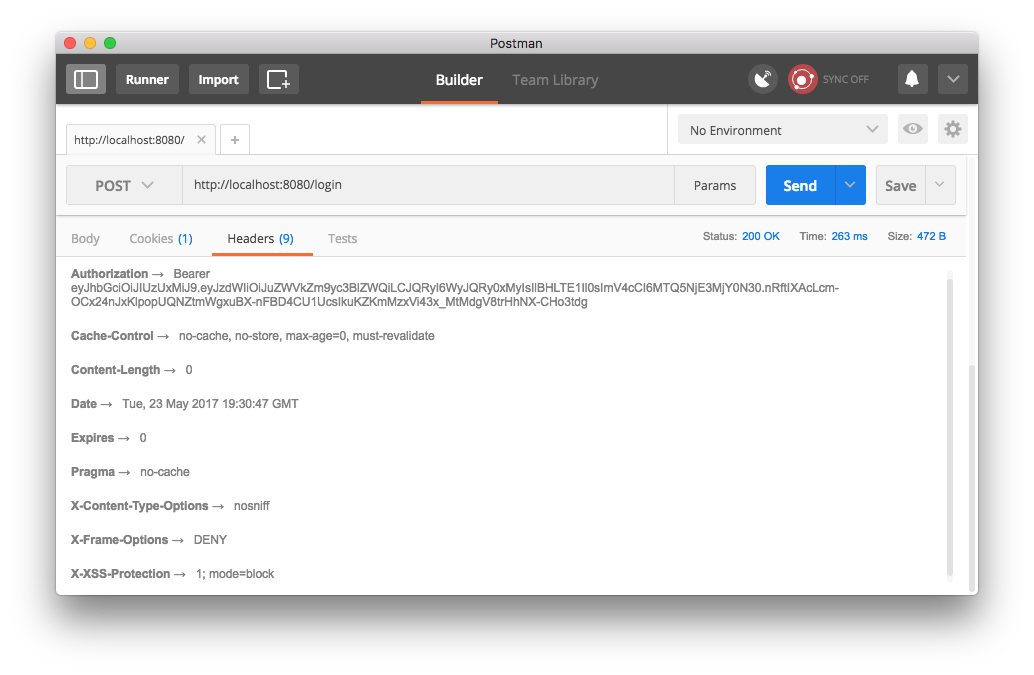
The token can be decoded for example at jwt.io and we find that the token is indeed signed using the secret of our application and contains the expected username and PG ratings.

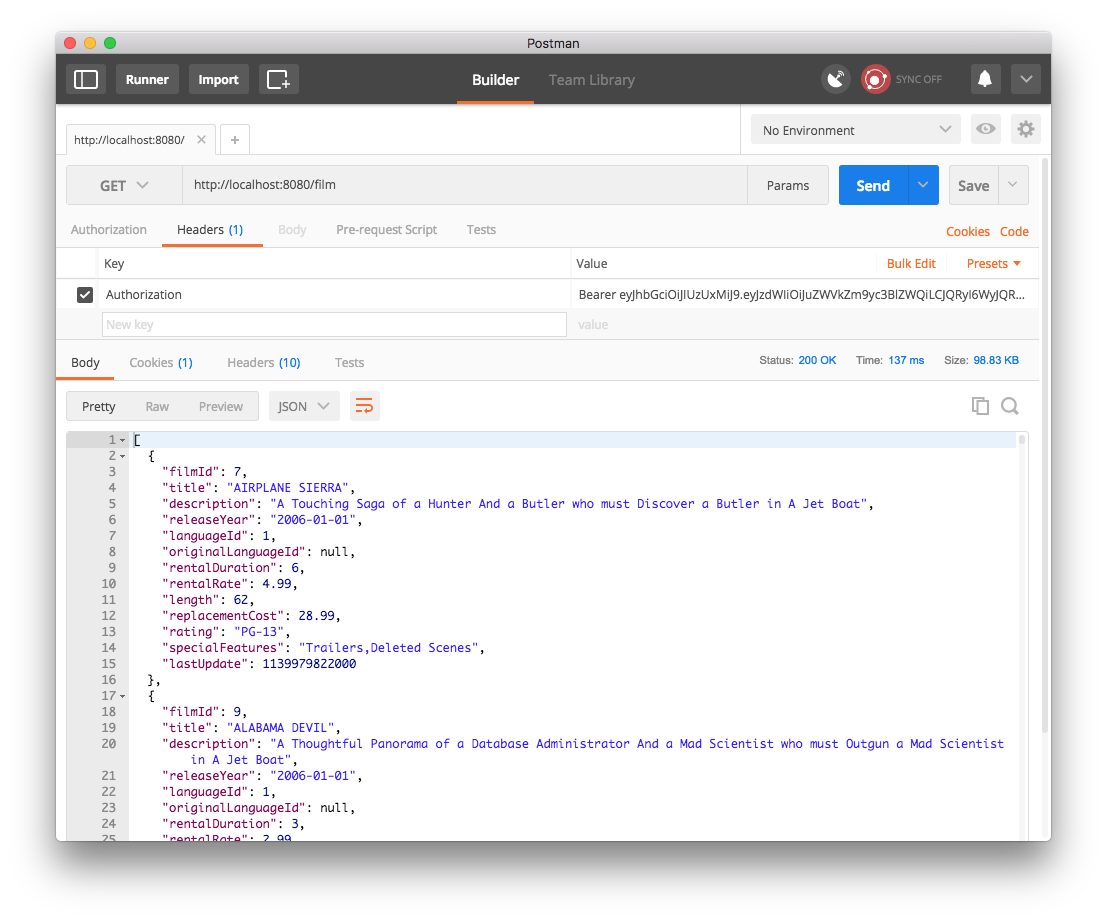
Adding the given JWT to subsequent requests, we will be allowed to GET films with matching PG rating. Requests with missing, malformed or unsigned JWT will be denied.
Tutorial 5 - Log errors in a database
In this tutorial, we will use Speedment to log exceptions in a single-table database. First off, we need to create the schema.
CREATE DATABASE IF NOT EXISTS `errors` DEFAULT CHARACTER SET utf8 COLLATE utf8_general_ci;

USE `errors`;
We then need to create the table to store our errors in.
CREATE TABLE IF NOT EXISTS `error` (

    `id` bigint(20) NOT NULL
        AUTO_INCREMENT,

    `timestamp` timestamp NOT NULL
        DEFAULT CURRENT_TIMESTAMP ON UPDATE CURRENT_TIMESTAMP,

    `message` text NOT NULL,

    PRIMARY KEY (`id`)

) ENGINE=InnoDB DEFAULT CHARSET=utf8 AUTO_INCREMENT=1 ;
Since every client must have access to the database to make changes, we will create a new MySQL user and only grant it writing rights to this single table.
CREATE USER 'logger'@'%' IDENTIFIED BY 'pass1234';

GRANT INSERT ON `errors`.`error`
    TO  'logger'@'%'
    IDENTIFIED BY  'pass1234'
    WITH MAX_QUERIES_PER_HOUR 0
    MAX_CONNECTIONS_PER_HOUR 0
    MAX_UPDATES_PER_HOUR 0
    MAX_USER_CONNECTIONS 0
;
And now we can start with the java part. Open up your favorite IDE and add the Speedment dependency and Speedment Maven Plugin to your pom.xml-file. A complete guide for how to do this is available here.
Go into your src/main/json/ folder, creating it if it doesn’t exist, and create a new file called speedment.json. Enter the following details into the file:
{
  "config" : {
    "name" : "errors",
    "dbmses" : [
      {
        "schemas" : [
          {
            "name" : "errors"
          }
        ],
        "name" : "db0",
        "ipAddress" : "127.0.0.1",
        "port" : 3306,
        "typeName" : "MySQL",
        "username" : "root"
      }
    ],
    "enabled" : true
  }
}
If your database is located somewhere else than on localhost, remember to change the info before you generate. When the file looks correct, run the reload maven goal and supply the database user password as follows.
mvn speedment:reload -Ddbms.password="!!!ROOT PASSWORD HERE!!!"
The password to the database needs to be supplied on the command line. The json file will be expanded with information about the entities in the database. Note that the json-file needs access to the database structure when the code is generated, but you can set more limited credentials in your runtime-application. To generate the java code, invoke the mvn speedment:generate goal.
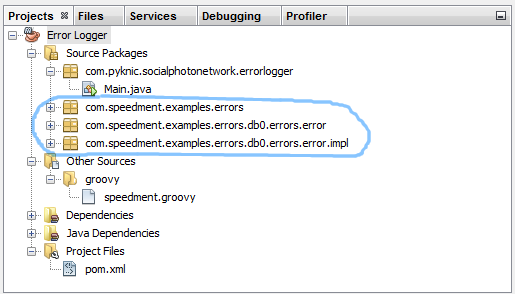
Three packages should be created. The location of these can be controlled in the .groovy-file.
Now when all the database code has been generated it is easy to add logging to the application. To make sure the Speedment platform is started before any logging we can use the Singleton-pattern. Create a new java-singleton-class as follows:
public final class ErrorLogger {

    private final ErrorsApplication speed;
    private final ErrorManager errors;

    private ErrorLogger() {
        speed = new ErrorsApplicationBuilder()
                .withBundle(MySqlBundle.class)
                .withUsername("logger")
                .withPassword("pass1234")
                .build();

        errors = speed.getOrThrow(ErrorManager.class);
    }

    public void log(Throwable thrw) {
        errors.create()
                .setMessage(thrw.getMessage())
                .persist(errors);
    }

    public static ErrorLogger inst() {
        return Holder.INST;
    }

    private static class Holder {
        private static final ErrorLogger INST = new ErrorLogger();
    }
}
Now we can call the log method to persist the message in our database!
try {
    int i = 10 / 0;
} catch (Exception ex) {
    ErrorLogger.inst().log(ex);
    System.exit(-1);
}
Tutorial 6 - Use Speedment with Java EE
When developing distributed applications that communicate over the web it is useful to have a solid framework as the foundation. In this tutorial, you will see how easy it is to integrate Speedment into a new Java EE application.
Prerequisites
In this tutorial, we use Netbeans IDE bundled with JDK 8 and Java EE. You can use any major IDE, but you might need to change some of the steps in the tutorial to better fit that environment.
In this example, we use a Glassfish server preinstalled on the development machine. Speedment requires a JDBC connection to work. A guide on how to set up a JDBC connection in GlassFish is available here.
If you want to use some other server software than Glassfish this should work just fine, but you might have to do some minor adjustments to the instructions in this tutorial.
Step 1: Create a new Java EE Project
In the Netbeans menu, navigate to File -> New Project and select Maven -> Web Application in the popup wizard. Press Next.
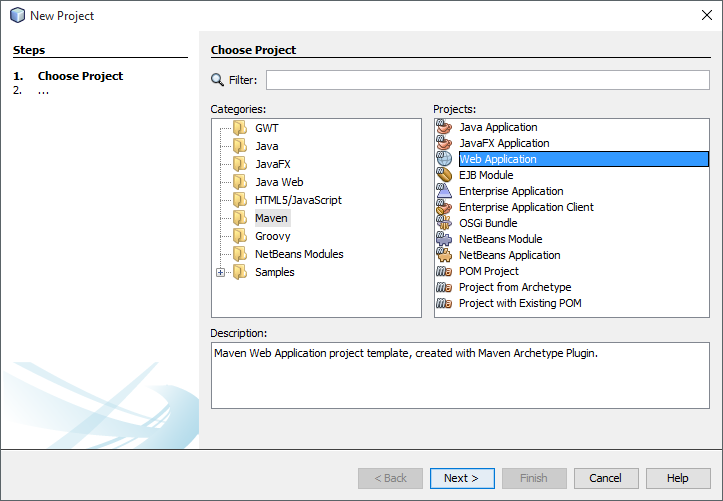
Choose a name for your application and optionally select a group id and version. Click Next.

Make sure GlassFish Server is selected and that the Java EE version is set to at least Java EE 7 Web. Press Finish to close the guide.
Step 2: Prepare your POM-File
If you open up your new project’s pom.xml-file you can see that Netbeans has added a lot of code to help you get started. Make sure the <source> and <target> tags are set to 1.8. Then add the following lines:
<build>
    <plugins>
        ...
        <plugin>
            <groupId>com.speedment</groupId>
            <artifactId>speedment-maven-plugin</artifactId>
            <version>3.2.5</version>
        </plugin>
        ...
    </plugins>
</build>
<dependencies>
    ...
    <dependency>
        <groupId>com.speedment</groupId>
        <artifactId>runtime</artifactId>
        <version>3.2.5</version>
    </dependency>
    ...
</dependencies>
Step 3: Run the Speedment Tool
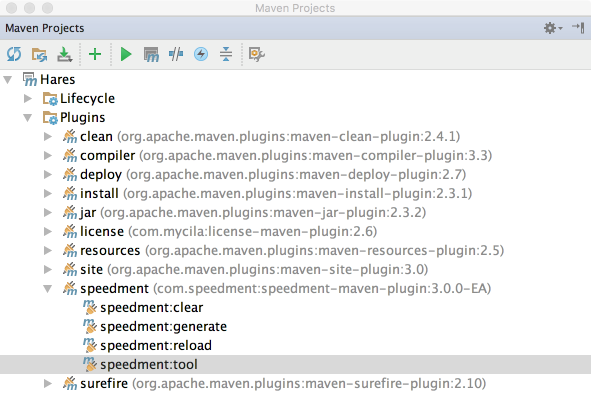
Now when you have added the Speedment dependencies to your POM you can select the project root node in the Netbeans Projects panel and look for two new Maven goals in the Navigator panel. It should look something like the picture below:
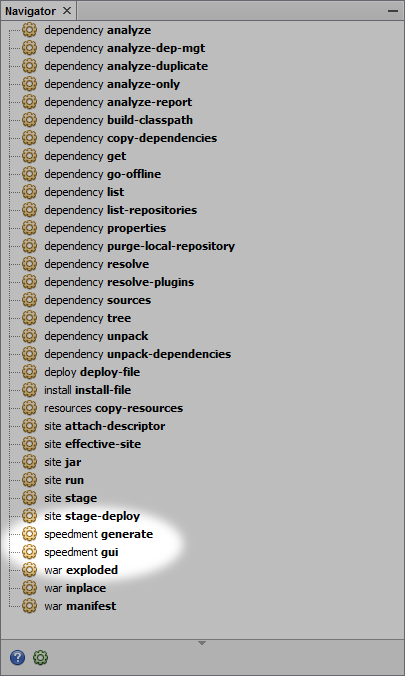
Double click the speedment:tool goal to open up the UI.
A complete guide on how to use the Speedment UI is available here.
Step 4: Create your First WebService
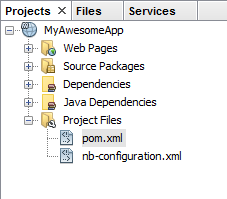
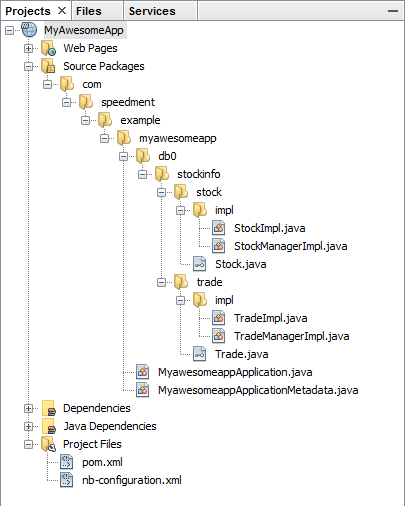
When you have generated your domain model using the Speedment UI your project tree should look something like this:
Now you are ready to get your hands dirty! Right-click on the myawesomeapp package (or what you choose to name it earlier) and select New -> Java Enum.... Name the file to App.java and press Finish.
In this file, we will create a Singleton to hold our Speedment instance. We can also put some utility methods for accessing the generated managers.
App.java
public enum App {
    INSTANCE;

    private final MyawesomeappApplication app;

    App() {
        this.app = new MyawesomeappApplicationBuilder()
            .withBundle(MySqlBundle.class)
            .withPassword("pass1234")
            .build();
    }

    public StockManager stocks() {
        return app.getOrThrow(StockManager.class);
    }

    public Manager<Trade> trades() {
        return app.getOrThrow(TradeManager.class);
    }
}
We can now access the managers for the tables Stock and Trade from anywhere in our application. This also means that we can share the MyawesomeappApplication instance between sessions and threads.
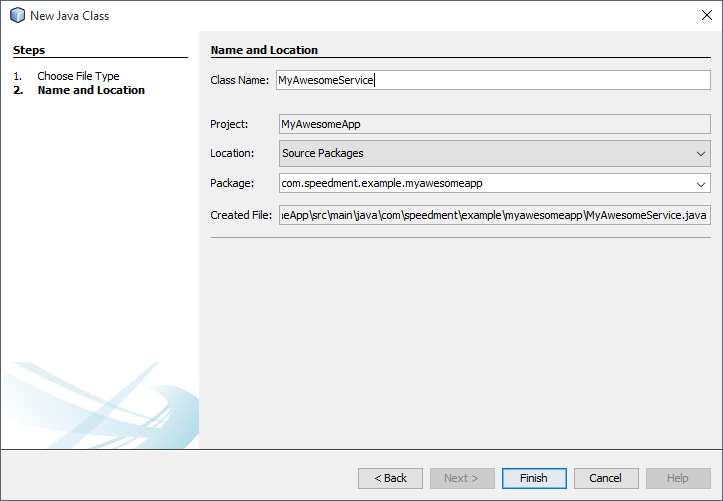
Now it’s time to actually do something. Let’s create a service that lists all the trades that has been registered in the stock market the last hour. Right-click the myawesomeapp package again and select New -> Java Class.... Name the class something appropriate for your new service, for an example MyAwesomeService.java.
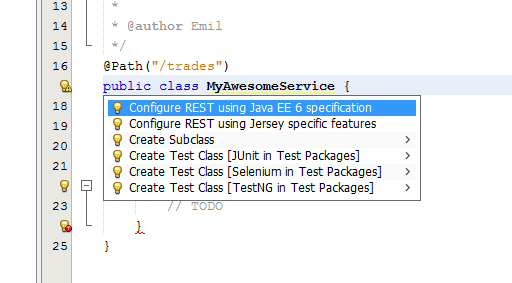
Define a new public method with a String as the return value, to be the entry point of our new service. Mark the class with the @Path annotation and the method with @GET, @Path and @Produces.
@Path("/trades")
public class MyAwesomeService {

    @GET
    @Path("/recent")
    @Produces("application/json")
    public String getRecentTrades() {
        // TODO
    }
}
Now you will see a yellow warning-flag appearing next to the class declaration. This is because Netbeans will need to configure the project for Java EE the first time you create a service. To do this, simply press the Configure REST using Java EE 6 specification option.
Implementing the business logic with Speedment is easy! We simply call the trades() method in the App singleton we created earlier and filter out the rows added during the last hour. Speedment entities also has a convenient toJson()-method that we can use.
@Path("/trades")
public class MyAwesomeService {

    @GET
    @Path("/recent")
    @Produces("application/json")
    public String getRecentTrades() {
        final long oneWeekAgo = (System.currentTimeMillis() / 1000) - 60 * 60;
        return "[" +
            App.INSTANCE.trades()
                .stream()
                .filter(Trade.DATE.greaterThan(oneWeekAgo))
                .map(JsonEncoder.allOf(App.INSTANCE.trades())::apply)
                .collect(joining(",")) +
            "]";

    }
}
This is great, but you might want to be a little more specific than that. What if you only want to show a certain amount of trades for a specific stock?
@Path("/trades")
public class MyAwesomeService {

    @GET
    @Path("/recent/{stock}/{start}/{limit}")
    @Produces("application/json")
    public String getRecentTrades(
            @PathParam("stock") int stock,
            @PathParam("skip") int skip,
            @PathParam("limit") int limit
            ) {
        final long oneWeekAgo = (System.currentTimeMillis() / 1000) - 60 * 60;
        return "[" +
            App.INSTANCE.trades()
                .stream()
                .filter(Trade.DATE.greaterThan(oneWeekAgo))
                .filter(Trade.STOCK.equal(stock))
                .skip(skip)
                .limit(limit)
                .map(JsonEncoder.allOf(App.INSTANCE.trades())::apply)
                .collect(joining(",")) +
            "]";

    }
}
If you run the application and browse to /trades/recent/120/0/100/ you will get a list of up to 100 trades for the stock with id 120 that has occurred during the last hour. The query that will be sent to the database looks like this:
SELECT * FROM `trade`
WHERE `trade`.`date` > ?
AND `trade`.`stock` = ?
LIMIT ?, ?;
The results will then be parsed into the following JSON object:
[
    ...
    {
        "id" : 376512,
        "stock" : 120,
        "date" : 1445378528,
        "value" : 115
    },
    ...
]
Tutorial 7 - Create Event Sourced Systems
Anyone that has tried to implement a fully ACID compliant system knows that there are a lot of considerations you have to do. You need to make sure database entities can be freely created, modified and deleted without the risk of errors, and in most cases, the solution will be at the cost of performance. One methodology that can be used to get around this is to design the system based on a series of events rather than mutable states. This is generally called Event Sourcing.
In this tutorial, we will build a demo application that uses Speedment to rapidly get a scalable event-sourced database application up and running. Full source code for the example is available here.
What is Event Sourcing?
In a typical relational database system you store the state of an entity as a row in a database. When the state changes, the application modifies the row using an UPDATE or a DELETE-statement. A problem with this method is that it adds a lot of requirements on the database when it comes to making sure that no row is changed in a way that puts the system in an illegal state. You don’t want anyone to withdraw more money than they have in their account or bid on an auction that has already been closed.
In an event-sourced system, we take a different approach to this. Instead of storing the state of an entity in the database, you store the series of changes that led to that state. An event is immutable once it is created, meaning that you only have to implement two operations, CREATE and READ. If an entity is updated or removed, that is realized using the creation of an “update” or “remove” event.
An event sourced system can easily be scaled up to improve performance, as any node can simply download the event log and replay the current state. You also get better performance due to the fact that writing and querying is handled by different machines. This is referred to as CQRS (Command-Query Responsibility Segregation). As you will see in the examples, we can get an eventually consistent materialized view up and running in a very little time using the Speedment toolkit.
The Bookable Sauna
To showcase the workflow of building an event sourced system we will create a small application to handle the booking of a shared sauna in a housing complex. We have multiple tenants interested in booking the sauna, but we need to guarantee that the shy tenants never accidentally double-book it. We also want to support multiple saunas in the same system.
To simplify the communication with the database, we are going to use the Speedment toolkit.
Step 1: Define the Database Schema
The first step is to define our (MySQL) database. We simply have one table called “booking” where we store the events related to booking the sauna. Note that a booking is an event and not an entity. If we want to cancel a booking or make changes to it, we will have to publish additional events with the changes as new rows. We are not allowed to modify or delete a published row.
CREATE DATABASE `sauna`;

CREATE TABLE `sauna`.`booking` (
  `id` BIGINT UNSIGNED NOT NULL AUTO_INCREMENT,
  `booking_id` BIGINT NOT NULL,
  `event_type` ENUM('CREATE', 'UPDATE', 'DELETE') NOT NULL,
  `tenant` INT NULL,
  `sauna` INT NULL,
  `booked_from` DATE NULL,
  `booked_to` DATE NULL,
  PRIMARY KEY (`id`)
);
The “id” column is an increasing integer that is assigned automatically every time a new event is published to the log. The “booking_id” tells us which booking we are referring to. If two events share the same booking id, they refer to the same entity. We also have an enum called “event_type” that describes which kind of operation we were trying to do. After that comes the information that belongs to the booking. If a column is NULL, we will consider that as unmodified compared to any previous value.
Step 2: Generating Code using Speedment
The next step is to generate code for the project using Speedment. Simply create a new maven project and add the following code to the pom.xml-file.
pom.xml
<properties>
    <project.build.sourceEncoding>UTF-8</project.build.sourceEncoding>
    <maven.compiler.source>1.8</maven.compiler.source>
    <maven.compiler.target>1.8</maven.compiler.target>
</properties>

<build>
    <plugins>
        <plugin>
            <groupId>com.speedment</groupId>
            <artifactId>speedment-maven-plugin</artifactId>
            <version>3.2.5</version>

            <dependencies>
                <dependency>
                    <groupId>mysql</groupId>
                    <artifactId>mysql-connector-java</artifactId>
                    <version>Z5.1.46</version>
                </dependency>
            </dependencies>
        </plugin>
    </plugins>
</build>

<dependencies>
    <dependency>
        <groupId>mysql</groupId>
        <artifactId>mysql-connector-java</artifactId>
        <version>Z5.1.46</version>
    </dependency>

    <dependency>
        <groupId>com.speedment</groupId>
        <artifactId>runtime</artifactId>
        <version>3.2.5</version>
        <type>pom</type>
    </dependency>
</dependencies>
If you build the project, a new maven goal called speedment:tool should appear in the IDE. Run it to launch the Speedment user interface. In there, connect to the Sauna database and generate code using the default settings. The project should now be populated with source files.
Tip: If you make changes to the database, you can download the new configuration using the speedment:reload-goal and regenerate sources using speedment:generate. No need to relaunch the tool!
Step 3: Creating the Materialized View
The materialized view is a component that regularly polls the database to see if any new rows have been added, and if so, downloads and merges them into the view in the correct order. Since the polling sometimes can take a lot of time, we want this process to run in a separate thread. We can accomplish that with a java Timer and TimerTask.
Polling the database? Really? Well, an important thing to take into consideration is that it is only the server that will poll the database, not the clients. This gives us very good scalability since we can have a handful of servers polling the database that in turn serve hundreds of thousands of tenants. Compare this with a regular system where every client would request a resource from the server, that in turn contacts the database.
BookingView.java
public final class BookingView {

    ...

    public static BookingView create(BookingManager mgr) {
        final AtomicBoolean working = new AtomicBoolean(false);
        final AtomicLong last  = new AtomicLong();
        final AtomicLong total = new AtomicLong();

        final String table = mgr.getTableIdentifier().getTableId();
        final String field = Booking.ID.identifier().getColumnId();

        final Timer timer = new Timer();
        final BookingView view = new BookingView(mgr, timer);
        final TimerTask task = ...;

        timer.scheduleAtFixedRate(task, 0, UPDATE_EVERY);
        return view;
    }
}
The timer task is defined anonymously and that is where the polling logic will reside.
final TimerTask task = new TimerTask() {
    @Override
    public void run() {
        boolean first = true;

        // Make sure no previous task is already inside this block.
        if (working.compareAndSet(false, true)) {
            try {

                // Loop until no events was merged
                // (the database is up to date).
                while (true) {

                    // Get a list of up to 25 events that has not yet
                    // been merged into the materialized object view.
                    final List<Booking> added = unmodifiableList(
                        mgr.stream()
                            .filter(Booking.ID.greaterThan(last.get()))
                            .sorted(Booking.ID.comparator())
     .limit(MAX_BATCH_SIZE)
                            .collect(toList())
                    );

                    if (added.isEmpty()) {
                        if (!first) {
                            System.out.format(
                                "%s: View is up to date. A total of " +
                                "%d rows have been loaded.%n",
                                System.identityHashCode(last),
                                total.get()
                            );
                        }

                        break;
                    } else {
                        final Booking lastEntity =
                            added.get(added.size() - 1);

                        last.set(lastEntity.getId());
                        added.forEach(view::accept);
                        total.addAndGet(added.size());

                        System.out.format(
                            "%s: Downloaded %d row(s) from %s. " +
                            "Latest %s: %d.%n",
                            System.identityHashCode(last),
                            added.size(),
                            table,
                            field,
                            Long.parseLong("" + last.get())
                        );
                    }

                    first = false;
                }

            // Release this resource once we exit this block.
            } finally {
                working.set(false);
            }
        }
    }
};
Sometimes the merging task can take more time to complete than the interval of the timer. To avoid this causing a problem, we use an AtomicBoolean to check and make sure that only one task can execute at the same time. This is similar to a Semaphore, except that we want tasks that we don’t have time for to be dropped instead of queued since we don’t really need every task to execute, a new one will come in just a second.
The constructor and basic member methods are fairly easy to implement. We store a BookingManager instance so that we can create new Booking instances. We store the timer passed to the class as a parameter in the constructor so that we can cancel that timer if we ever need to stop. We also store a map that keeps the current view of all the bookings in memory.
private final static int MAX_BATCH_SIZE = 25;
private final static int UPDATE_EVERY   = 1_000; // Milliseconds

private final BookingManager mgr;
private final Timer timer;
private final Map<Long, Booking> bookings;

private BookingView(BookingManager mgr, Timer timer) {
    this.mgr = requireNonNull(mgr);
    this.timer = requireNonNull(timer);
    this.bookings = new ConcurrentHashMap<>();
}

public Stream<Booking> stream() {
    return bookings.values().stream();
}

public void stop() {
    timer.cancel();
}
The last missing piece of the BookingView class is the accept()-method used above in the merging procedure. This is where new events are taken into consideration and merged into the view.
private boolean accept(Booking ev) {
    final String type = ev.getEventType();

    // If this was a creation event
    switch (type) {
        case "CREATE" :
            // Creation events must contain all information.
            if (!ev.getSauna().isPresent()
            ||  !ev.getTenant().isPresent()
            ||  !ev.getBookedFrom().isPresent()
            ||  !ev.getBookedTo().isPresent()
            ||  !checkIfAllowed(ev)) {
                return false;
            }

            // If something is already mapped to that key, refuse the
            // event.
            return bookings.putIfAbsent(ev.getBookingId(), ev) == null;

        case "UPDATE" :
            // Create a copy of the current state
            final Booking existing = bookings.get(ev.getBookingId());

            // If the specified key did not exist, refuse the event.
            if (existing != null) {
                final Booking proposed = mgr.create();
                proposed.setId(existing.getId());

                // Update non-null values
                proposed.setSauna(ev.getSauna().orElse(
                    unwrap(existing.getSauna())
                ));
                proposed.setTenant(ev.getTenant().orElse(
                    unwrap(existing.getTenant())
                ));
                proposed.setBookedFrom(ev.getBookedFrom().orElse(
                    unwrap(existing.getBookedFrom())
                ));
                proposed.setBookedTo(ev.getBookedTo().orElse(
                    unwrap(existing.getBookedTo())
                ));

                // Make sure these changes are allowed.
                if (checkIfAllowed(proposed)) {
                    bookings.put(ev.getBookingId(), proposed);
                    return true;
                }
            }

            return false;


        case "DELETE" :
            // Remove the event if it exists, else refuse the event.
            return bookings.remove(ev.getBookingId()) != null;

        default :
            System.out.format(
                "Unexpected type '%s' was refused.%n", type);
            return false;
    }
}
In an event sourced system, the rules are not enforced when events are received but when they are materialized. Basically, anyone can insert new events into the system as long as they do it at the end of the table. It is in this method that we choose to discard events that don’t follow the rules set up.
Step 4: Example Usage
In this example, we will use the standard Speedment API to insert three new bookings into the database, two that are valid and a third that intersects one of the previous ones. We will then wait for the view to update and print out every booking made.
public static void main(String... params) {
    final SaunaApplication app = new SaunaApplicationBuilder()
        .withBundle(MySqlBundle.class)
        .withPassword("password")
        .build();

    final BookingManager bookings =
        app.getOrThrow(BookingManager.class);

    final SecureRandom rand = new SecureRandom();
    rand.setSeed(System.currentTimeMillis());

    // Insert three new bookings into the system.
    bookings.persist(
        bookings.create()
            .setBookingId(rand.nextLong())
            .setEventType("CREATE")
            .setSauna(1)
            .setTenant(1)
            .setBookedFrom(Date.valueOf(LocalDate.now().plus(3, DAYS)))
            .setBookedTo(Date.valueOf(LocalDate.now().plus(5, DAYS)))
    );

    bookings.persist(
        bookings.create()
            .setBookingId(rand.nextLong())
            .setEventType("CREATE")
            .setSauna(1)
            .setTenant(2)
            .setBookedFrom(Date.valueOf(LocalDate.now().plus(1, DAYS)))
            .setBookedTo(Date.valueOf(LocalDate.now().plus(2, DAYS)))
    );

    bookings.persist(
        bookings.create()
            .setBookingId(rand.nextLong())
            .setEventType("CREATE")
            .setSauna(1)
            .setTenant(3)
            .setBookedFrom(Date.valueOf(LocalDate.now().plus(2, DAYS)))
            .setBookedTo(Date.valueOf(LocalDate.now().plus(7, DAYS)))
    );

    final BookingView view = BookingView.create(bookings);

    // Wait until the view is up-to-date.
    try { Thread.sleep(5_000); }
    catch (final InterruptedException ex) {
        throw new RuntimeException(ex);
    }

    System.out.println("Current Bookings for Sauna 1:");
    final SimpleDateFormat dt = new SimpleDateFormat("yyyy-MM-dd");
    final Date now = Date.valueOf(LocalDate.now());
    view.stream()
        .filter(Booking.SAUNA.equal(1))
        .filter(Booking.BOOKED_TO.greaterOrEqual(now))
        .sorted(Booking.BOOKED_FROM.comparator())
        .map(b -> String.format(
            "Booked from %s to %s by Tenant %d.",
            dt.format(b.getBookedFrom().get()),
            dt.format(b.getBookedTo().get()),
            b.getTenant().getAsInt()
        ))
        .forEachOrdered(System.out::println);

    System.out.println("No more bookings!");
    view.stop();
}
If we run it, we get the following output:
677772350: Downloaded 3 row(s) from booking. Latest id: 3.
677772350: View is up to date. A total of 3 rows have been loaded.
Current Bookings for Sauna 1:
Booked from 2016-10-11 to 2016-10-12 by Tenant 2.
Booked from 2016-10-13 to 2016-10-15 by Tenant 1.
No more bookings!
Full source code for this demo application is available on this GitHub page. There you can also find many other examples on how to use Speedment in various scenarios to rapidly develop database applications.
Summary
In this tutorial, we have developed a materialized view over a database table that evaluates events on materialization and not upon insertion. This makes it possible to spin up multiple instances of the application without having to worry about synchronizing them since they will be eventually consistent. We then finished by showing how the materialized view can be queried using the Speedment API to produce a list of current bookings.
Tutorial 8 - Writing Your Own Extensions
Speedment is built up using a number of different components. These components handle everything from translating the relational database results into an object-oriented metadata model for logging debug messages throughout the system. One important feature of the component system is the ability to extend the platform with your own code. In this tutorial, we will go through how to create a new custom component and add it to an existing Speedment project.
Step 1 - Create a component project
Each custom component should reside in its own maven project. This will allow you to add it as a dependency to any project where you want to make use of the component. Begin by creating a new project and specify the pom.xml file to extend the speedment main project with the same version as the project version:
<?xml version="1.0" encoding="UTF-8"?>
<project xmlns="http://maven.apache.org/POM/4.0.0" xmlns:xsi="http://www.w3.org/2001/XMLSchema-instance" xsi:schemaLocation="http://maven.apache.org/POM/4.0.0 http://maven.apache.org/xsd/maven-4.0.0.xsd">
    <modelVersion>4.0.0</modelVersion>
    <groupId>com.speedment</groupId>
    <artifactId>speedment-awesome-plugin</artifactId>
    <version>3.2.0</version>
    <packaging>jar</packaging>

    <name>Awesome Speedment Plugin</name>

    <properties>
        <project.build.sourceEncoding>UTF-8</project.build.sourceEncoding>
        <maven.compiler.source>1.8</maven.compiler.source>
        <maven.compiler.target>1.8</maven.compiler.target>
    </properties>

    <dependencies>
        <dependency>
            <groupId>com.speedment</groupId>
            <artifactId>runtime</artifactId>
            <version>${project.version}</version>
            <type>pom</type>
        </dependency>
    </dependencies>
</project>
Step 2 - Write a Component Class
The real magic of the plugins is done inside the component class. Here we can hook up code to run at different stages during the execution.
public final class Awesome extends AbstractComponent {

    @Override
    public Class<? extends Component> getComponentClass() {
        return Awesome.class;
    }

    @ExecuteBefore(INITIALIZED)
    public AbstractComponent initialize() {
        // Write some code here...
        return this;
    }

    @ExecuteBefore(RESOLVED)
    public AbstractComponent resolve( @WithState(INITIALIZED) OtherComponent other) {
        // ...or here...
        return this;
    }

    @ExecuteBefore(STARTED)
    public AbstractComponent start() {
        // ...or even here.
        return this;
    }
}
Other components can be made available by declaring them as parameters. During start-up components, progress through the states CREATED, INITIALIZED, RESOLVED and STARTED in that order. Initialization order dependencies of components may be expressed with the @WithState annotation. The number of available states to ask for in the @WithState annotation are limited by the fact that no component will enter a state before all other components have reached the preceding state (thus all components will reach for example INITIALIZED before any component can reach RESOLVED).
Here is an example of how a plugin could define a new DbmsType:
@ExecuteBefore(RESOLVED)
public AbstractComponent resolve(@WithState(RESOLVED) DbmsHandlerComponent dbmsHandler) {
    dbmsHandler.install(
            new ReallyCoolNewDbmsType()
    );
}
Another example of the power in the component system is the extendability of the GUI. In this example, we will add some extra logic to analyze the generated metamodel before it is shown in the GUI.
@ExecuteBefore(RESOLVED)
public AbstractComponent resolve(@WithState(RESOLVED) EventComponent eventComponent) {
    eventComponent.on(ProjectLoaded.EVENT, event -> {
        event.project().traverseOver(ForeignKey.class).forEach(fk -> {
            System.out.println("Found path between " +
                fk.ancestor(Table.class).map(Table::getName).get() +
                " and " +
                fk.getForeignTableName() + "."
            );
        });
    }
    return this;
}
Step 3 - Using the Component in an External Project
If you want to use your new component in an external project and you want it to be executed in the same java runtime as for an example the GUI, you need to do two small adjustments to the speedment-maven-plugin-tag of your pom.xml. You need to add your new component project as a dependency to the Speedment plugin and configure it to load it.
...
<plugin>
    <groupId>com.speedment</groupId>
    <artifactId>speedment-maven-plugin</artifactId>
    <version>3.2.5</version>

    <!-- Add your awesome plugin to the list of dependencies -->
    <dependencies>
        <dependency>
            <groupId>com.speedment</groupId>
            <artifactId>speedment-awesome-plugin</artifactId>
            <version>3.2.0</version>
        </dependency>
    </dependencies>

    <!-- Make sure the builder is loaded when the maven plugin is started -->
    <configuration>
        <components>
            <component implementation="com.speedment.plugin.awesome.AwesomeBuilder"></component>
        </components>
    </configuration>
</plugin>
Tutorial 9 - Formatting Your Output as JSON
Often when you write database applications you will need to send different output to a client app. There are many protocols for sending results over a network. One of the most common is json.
Speedment can handle JSON output using the json plugin.
Single entity
// Single user as json.
User user = ...;
String json = allOf(users).apply(user);
Multiple entities
Using method references, this can be done inline in the stream declaration.
// List of all users as json.
List<String> userJsonList = users.stream()
    .map(JsonEncoder.allOf(users)::apply)
    .collect(toList());
If you want to parse the complete result to one single json array, simply call collect.
// Json array of all users.
String many = users.stream().collect(JsonCollector.toJson(allOf(users)));
Choose which data to include
Often you don’t want every column to be included in the json output. In the User example above, you might have hashed passwords and other sensitive user information that you don’t want to expose. Limiting which columns to expose is easy using the JsonEncoder-object.
// Only include the first and last name of users.
JsonEncoder<User> encoder = JsonEncoder.noneOf(users)
    .put(User.FIRSTNAME)
    .put(User.LASTNAME);

String json = users.stream().collect(JsonCollector.toJson(encoder));
Follow foreign-keys
The encoder can be configured to follow foreign keys. In this example, we also want to include all the images posted by every user in the json output. In the database, each Image has a foreign key to a User. Speedment uses this to create a backward stream from User to Image.
// Include a list of image titles for each user.
JsonEncoder<User> encoder = JsonEncoder.noneOf(users)
    .put(User.FIRSTNAME)
    .put(User.LASTNAME)
    .put("images", (user, imageManager) -> users.findImages(users), JsonFormatter.noneOf(images)
        .put(Image.TITLE)
    );

String json = User.stream().collect(CollectorUtil.toJson(encoder));
Result
[
    {
        "firstname" : "Spire",
        "lastname" : "Harrysson",
        "images" : [
            {"title" : "sunset.jpg"},
            {"title" : "desert.jpg"},
            ...
            {"title" : "forest.jpg"}
        ]
    },
    ...
]
Grab all columns
If you don’t want to add every single column manually, you can simply include all in the creation of the encoder object.
// Include all columns in the table 'User'
JsonEncoder<User> encoder = JsonEncoder.allOf(users);
Sometimes you want to use all the columns except for some that might contain sensitive data. In those cases, the .remove()-method is handy.
// Include all columns in the table 'User' except 'password'
JsonEncoder<User> encoder = JsonEncoder
    .allOf(users)
    .remove(User.PASSWORD)
;
If you put() a field association that already in the JsonEncoder, the new field will replace the old one.
Tutorial 10 - Working with Blobs and Clobs
There are a number of issues that have to be taken into consideration when working with Large Objects like Blobs and Clobs.
- Blob and Clob object methods often throw checked SQLExceptions and because of that, it is awkward to use them in lambdas commonly used in streams.
- Blob and Clob objects are only valid within the stream and cannot be used directly outside the stream.
Work Arounds
There are several ways of handling LOBs within Speedment.
- Use a column TypeMapper and convert a Blob to a byte[] or a Clob to a String. This makes it much more easy to work with the data but the drawback is that the Blob and Clob are eagerly converted regardless of being used or not in the stream.
- Restrict the usage of LOBs within the stream and materialize the LOBs to another object if used. Use wrapper methods that can access the LOBs and that can wrap the SQLException into a RuntimeException. A Blob can be materialized using a SerialBlob and a Clob can be materialized using a SerialClob.
Examples
Assuming we have an object that handles a Blob like this using its C2 column:
public interface LargeObjectsDatatypes {
    Optional<Blob> getC2();
    LargeObjectsDatatypes setC2(Blob c2);
}
we can handle the Blob within the stream like this:
    manager.stream().forEach(bt -> {
        bt.getC2().ifPresent(b -> {
            try {
                System.out.println("length = " + b.length());
            } catch (SQLException sqle) {
                throw new RuntimeException(sqle);
            }
        }
        );
    });
Because the Blob does not escape the stream (it is only used within the stream’s forEach() method) it can be used directly.
If we want to use a Blob outside a stream, we can do like this:
final Optional<Blob> blob = manager.stream()
        .map(this::copyBlob) // Create a materialized Blob
        .findAny()
        .flatMap(LargeObjectsDatatypes::getC2);

// Wrapper method
private LargeObjectsDatatypes copyBlob(LargeObjectsDatatypes bt) {
    try {
        final Optional<Blob> oldBlob = bt.getC2();
        final Blob newBlob;
        if (oldBlob.isPresent()) {
            newBlob = new SerialBlob(oldBlob.get());
        } else {
            newBlob = null;
        }
        bt.setC2(newBlob);
        return bt;
    } catch (SQLException sqle) {
        throw new RuntimeException(sqle);
    }
}
Questions and Discussion
If you have any question, don’t hesitate to reach out to the Speedment developers on Gitter.