Installation
To install the Speedment Maven Plugin, include it as a plugin in your pom.xml file as described hereunder:
    <build>
        <plugins>
            <plugin>
                <groupId>com.speedment</groupId>
                <artifactId>speedment-maven-plugin</artifactId>
                <version>${speedment.version}</version>
            </plugin>
        </plugins>
    </build>
Once the file has been saved, the new Maven targets are immediately available to your project.
Set the property ${speedment.version} to the latest Speedment version released (currently 3.2.10). A list of all versions of the Speedment Maven Plugin can be found here.
Since Speedment generates code from a database, you usually need to specify a JDBC Driver as a dependency so that Speedment knows how to connect to it. In the example below, the MySql JDBC Driver is specified:
    <build>
        <plugins>
            <plugin>
                <groupId>com.speedment</groupId>
                <artifactId>speedment-maven-plugin</artifactId>
                <version>${speedment.version}</version>
                <dependencies>
                    <dependency>
                        <groupId>mysql</groupId>
                        <artifactId>mysql-connector-java</artifactId>
                        <version>6.0.6</version>
                    </dependency>
                </dependencies>
            </plugin>
        </plugins>
    </build>
Installation Example
Here is an example of a complete POM file that is setup for a Speedment application that runs against a MySQL database:
<?xml version="1.0" encoding="UTF-8"?>
<project xmlns="http://maven.apache.org/POM/4.0.0" xmlns:xsi="http://www.w3.org/2001/XMLSchema-instance" xsi:schemaLocation="http://maven.apache.org/POM/4.0.0 http://maven.apache.org/xsd/maven-4.0.0.xsd">
    <modelVersion>4.0.0</modelVersion>
    <groupId>com.company</groupId>
    <artifactId>test-speedment</artifactId>
    <version>1.0.0-SNAPSHOT</version>
    <packaging>jar</packaging>
    <properties>
        <project.build.sourceEncoding>UTF-8</project.build.sourceEncoding>
        <maven.compiler.source>1.8</maven.compiler.source>
        <maven.compiler.target>1.8</maven.compiler.target>
        <speedment.version>3.2.10</speedment.version>
    </properties>
    <build>
        <plugins>
            <plugin>
                <groupId>com.speedment</groupId>
                <artifactId>speedment-maven-plugin</artifactId>
                <version>${speedment.version}</version>
                <dependencies>
                    <dependency>
                        <groupId>mysql</groupId>
                        <artifactId>mysql-connector-java</artifactId>
                        <version>5.1.46</version>
                    </dependency>
                </dependencies>
            </plugin>
        </plugins>
    </build>
    <dependencies>
        <dependency>
            <groupId>com.speedment</groupId>
            <artifactId>runtime</artifactId>
            <version>${speedment.version}</version>
            <type>pom</type>
        </dependency>
        <dependency>
            <groupId>mysql</groupId>
            <artifactId>mysql-connector-java</artifactId>
            <version>5.1.46</version>
        </dependency>
    </dependencies>
</project>
Maven Targets
The Speedment Maven Plugin has Maven targets that can be used to simplify and/or automate the build process. These Maven targets can be used to read the meta data (e.g. schemas, tables and columns) from the database. They are also used to generate code that can used in your applications. Therefore, before you can use Speedment, you must run at least one of the Maven targets.
These are the seven Maven targets in the Speedment Maven Plugin:
| Target | Purpose | Tool |
|---|---|---|
| tool | Starts the graphical tool that connects to an existing database | Yes |
| init | Initializes a new Speedment project (without using Tool) | No |
| edit | Modifies the speedment.json-file (without using Tool) | No |
| generate | Generates code from the speedment.json-file (without using Tool) | No |
| reload | Reloads meta data and merges changes with the existing config file | No |
| clear | Removes all generated code | No |
| clearTables | Removes all tables, columns, indexes etc from the config file | No |
Most of the operations can be performed inside the graphical tool.
Tool
The speedment:tool target is used to launch the Speedment Graphical Tool that can be used to connect to the database and generate code. All settings are saved in a JSON configuration file. Click here to read more about the graphical tool.
Init
The speedment:init target
is used to create a new speedment.json-file from scratch without having to connect to the database. This can for an example be used to setup the database-connection from a script instead of launching the tool and doing it manually. This command is usually followed by speedment:reload or speedment:edit.
Here is a full example of how a new Speedment project can be setup:
mvn speedment:init \
  -Ddebug=true \
  -DcompanyName="My Company Inc." \
  -DappName="My Awesome App" \
  -Dpackage.location="target/generated-sources/main/java/" \
  -Dpackage.name="com.yourcompany.yourapp" \
  -Ddbms.type=MySQL \
  -Ddbms.host=localhost \
  -Ddbms.port=3306 \
  -Ddbms.schemas=employees,sakila \
  -Ddbms.username=root \
  -Ddbms.password=password \
  -DconfigFile="your-config-file.properties"
Typically, you will want to specify atleast -Ddbms.schemas and -Ddbms.type to be able to call mvn speedment:reload. If your database root account is password protected, you probably also need to specify -Ddbms.password and/or -Ddbms.username.
Edit
By using the speedment:init target you can search and insert/replace something in the speedment.json-file without having to do it manually in the tool. A common use case for this is to batch-disable multiple tables that you don’t need or to change the typeMapper of all columns of a particular type.
The following parameters are available:
| Parameter | Optional | Type |
|---|---|---|
| -Dset | No | |
| -Dwhere | Yes* | |
| -Dwhat | Yes* | Project, Dbms, Table, etc |
| -Ddelete | Yes | Boolean (default false) |
*The default behaviour is that all objects are matched.
-Dset=[KEY]:[VALUE] This parameter is required. It specified which JSON-attribute to edit or create, and the new value. If the attribute doesn’t exist, then it will be created in every JSON object that matches the condition.
-Dwhere=[ID]
This parameter specifies which objects should be edited. This is the simple form of the -Dwhere=-parameter. This parameter is optional, and if left out, then the set-operation will be used on all otherwise matched objects. It simply takes the ID of the objects to match and nothing more. This parameter is optional.
-Dwhere=[KEY]:[EXPRESSION]
This parameter specifies which objects should be edited. This is the advanced form of the -Dwhere=-parameter. in addition to the key describing which JSON-attribute to look at in the search, it also has an expression that takes the form of one or several Regex-expressions separated with an arrow ->. This allows a very fine-grained control over which objects are matched. The arrows represent parent-child relations of the matched objects. An empty expression will represent all those objects.
For an example, this expression matches children with a databaseType of java.sql.Date where the parent is enabled:
-Dwhere=enabled:true->databaseType:java\.sql\.Date
Note that the search engine doesn’t take default values into consideration. Even though the default value for enabled is true, those objects will not be matched in the above example unless the attribute enabled is explicitly specified as true.
-Dwhat=[TYPE]
The type of objects to match. This parameter is optional. This is case insensitive and can take many different forms. Typical values are either project, dbms, schema, table, column, primarykeycolumn, index, indexcolumn, foreignkey or foreignkeycolumn. This parameter is optional, and if left out, then the set-operation will be used on all otherwise matched objects. If the parameter is used togather with -Dwhere=, then the last expression will beapplied to objects of this type, the second-last expression will be applied to its parent and so on.
-Ddelete=[BOOL]
This parameter can be used to delete matched nodes from the speedment.json-file. It is therefore used as an alternative to -Dset= that simply modifies matched nodes.
Removes all disabled tables:
mvn speedment:edit \
  -Dwhat=table \
  -Dwhere=enabled:false \
  -Ddelete=true
Usage
Here are some examples on how it can be used:
Disable all nodes:
mvn speedment:edit -Dset=enabled:false
Disable all nodes with id “employees”:
mvn speedment:edit -Dset=enabled:false -Dwhere=employees
Disable all nodes where id matches the regular expression “empl.*”:
mvn speedment:edit -Dset=enabled:false -Dwhere=id:empl.*
Disable all tables:
mvn speedment:edit -Dset=enabled:false -Dwhat=table
Disable all columns in the “employees” table:
mvn speedment:edit -Dset=enabled:false -Dwhat=column -Dwhere=employees->
Disable all columns containing the word “password” in the “employees” table:
mvn speedment:edit -Dset=enabled:false -Dwhat=column -Dwhere=employees->name:password
Change the typeMapper of all Date-columns into LocalDate:
mvn speedment:edit -Dset=typeMapper:com.speedment.runtime.typemapper.time.DateToLocalDateMapper -Dwhat=column -Dwhere=databaseType:java\.sql\.Date
Chain the edit into an automated build:
mvn speedment:reload -Ddbms.password=password \
    speedment:edit -Dset=enabled:false -Dwhat=column -Dwhere=users->password \
    speedment:generate
Generate
The speedment:generate target is used to generate code directly from the JSON configuration file without connecting to the database and without starting the Tool.
Reload
The speedment:reload target is used to reload the metadata from the database and merges any changes with the existing JSON configuration file without starting the Tool.
Clear
The speedment:clear target is used to remove all the generated files from your project without starting the Tool. Files that are manually changed are protected by a cryptographic hash code and will not be removed.
Clear Tables
The speedment:clearTables target is used to remove all tables, columns, indexes and foreign keys from the configuration file. This is useful if you want clear you config file and then run Reload to obtain an exact copy of the database, regardless of the configuration file’s previous state.
Configuration
The Speedment Maven Plugin can be configured in many ways. A special debug mode can be set and new functionality can be added dynamically by adding TypeMappers, Components and InjectBundles.
Enable Debug Mode
If you want to follow more closely what is going on in one or several of the Speedment Maven Plugin Maven targets, you can enable Debug Mode. In this mode, information about what classes are being initiated is shown in the standard logger together with other data. This makes it easier to trouble-shoot problems and can provide valuable information in many cases.
Enable debug mode by adding a <debug>true</debug> element in the POM as described hereunder:
    <build>
        <plugins>
            <plugin>
                <groupId>com.speedment</groupId>
                <artifactId>speedment-maven-plugin</artifactId>
                <version>${speedment.version}</version>
                <configuration>
                    <debug>true</debug>
                </configuration>
            </plugin>
        </plugins>
    </build>
Adding a Type Mapper
TypeMappers are used to map a database type to a Java type and vice versa. For example, a Timestamp field can be mapped to the Java type long to save memory and reduce the number of objects that are created during execution. Any number of TypeMappers can be added to the Maven Targets dynamically and will then be available like any built-in TypeMapper.
A custom TypeMapper should be created in a separate project together with a component that is used to install the TypeMapper as described in this tutorial
This example show a Gender TypeMapper that converts a String to one of the Enum objects MALE, FEMALE or OTHER:
public enum Gender {
    MALE   ("Male"),
    FEMALE ("Female"),
    OTHER  ("Other");

    private final String databaseName;

    Gender(String databaseName) {
        this.databaseName = databaseName;
    }

    public String getDatabaseName() {
        return databaseName;
    }

    public static Gender ofDatabaseName(String name) {
        for (Gender gender : values()) {
            if (gender.databaseName.equals(name)) {
                return gender;
            }
        }
        throw new UnsupportedOperationException(
                "Unknown gender '" + name + "'."
        );
    }
}
Here is the custom TypeMapper that will convert a database String column value to the Gender class and vice versa:
public final class StringToGenderMapper implements TypeMapper<String, Gender> {
    @Override
    public String getLabel() {
        return "String to Gender";
    }

    @Override
    public Type getJavaType(Column column) {
        return Gender.class;
    }

    @Override
    public Gender toJavaType(Column column, Class<?> aClass, String value) {
        return value != null ? Gender.ofDatabaseName(value) : null;
    }

    @Override
    public String toDatabaseType(Gender value) {
        return value != null ? value.getDatabaseName() : null;
    }
}
Here is the installation Component that is used to associate the custom TypeMapper to the Set of string-basedTypeMapper objects that exists in the system:
public final class CustomMappingComponent {

    @ExecuteBefore(RESOLVED)
    public void onResolve(@WithState(INITIALIZED) TypeMapperComponent typeMapper) {
        typeMapper.install(String.class, StringToGenderMapper::new);
    }
}
This is how you configure your POM file to use the custom component, both for code generation and for your application’s runtime:
    <build>
        <plugin>
            <groupId>com.speedment</groupId>
            <artifactId>speedment-maven-plugin</artifactId>
            <version>${speedment.version}</version>
            <configuration>
                <components>
                    <!-- Path to the component installer -->
                    <component>com.github.pyknic.salesinfo.plugin.CustomMappingComponent</component>
                </components>
            </configuration>
        </plugin>
    <build>
    <dependencies>
        <dependency>
            <groupId>com.speedment</groupId>
            <artifactId>runtime</artifactId>
            <version>${speedment.version}</version>
            <type>pom</type>
        </dependency>
        <dependency>
            <groupId>mysql</groupId>
            <artifactId>mysql-connector-java</artifactId>
            <version>5.1.40</version>
        </dependency>
        <!-- Remember to depend on the external project with the custom TypeMapper -->
        <dependency>
            <groupId>com.github.pyknic</groupId>
            <artifactId>custom-mapping-component</artifactId>
            <version>1.0.0-SNAPSHOT</version>
        </dependency>
    </dependencies>
The TypeMapper above also converts information in the other direction. For example, if a mapped property is MALE and is persisted in the database, the value in the database will read “Male”.
TypeMappers that are added to the plugins must also be on the class path once our application run. If the TypeMapper comes from an external project, remember to depend on the artifact that contains the TypeMapper in your POM file as shown in the last part of the example above.
Adding a Component
A component can extend or change Speedment functionality. Most functions within Speedment are handled by Components. Components are easily added to the plugins like this:
<plugin>
    <groupId>com.speedment</groupId>
    <artifactId>speedment-maven-plugin</artifactId>
    <version>${speedment.version}</version>
    <dependencies>
        <dependency>
            <groupId>com.company</groupId>
            <artifactId>component</artifactId>
            <version>1.0.0</version>
            </dependency>
    </dependencies>
    <configuration>
        <components>
            <component>com.company.component.MyCodeFormattingComponent</component>
        </components>
    </configuration>
</plugin>
In the example above, someone has written a Component that will plug in its own code generation views so that the Java code generated by Speedment will be formatted in a custom way compared to the default code. Perhaps that person wanted to be able to control the order of methods in a class so that they are introduced in alphabetic order rather than in insertion order.
Read more in this tutorial on how to create custom components.
Adding a Bundle
An InjectBundle simply represents a collection of Components that can be installed in one sweep using just one reference. Typically, custom database support are installed using an InjectBundle because several Components are needed to support a new database type. In the example below a fictive H2 open-source database driver is added to the plugins:
<plugin>
    <groupId>com.speedment</groupId>
    <artifactId>speedment-maven-plugin</artifactId>
    <version>${speedment.version}</version>
    <!-- Add Oracle to the list of dependencies -->
    <dependencies>
        <dependency>
            <groupId>com.h2database</groupId>
            <artifactId>h2</artifactId>
            <version>1.4.194</version>
            <scope>runtime</scope>
        </dependency>
    </dependencies>
    <!-- Make sure the H2 Bundle is loaded when the maven plugin is started -->
    <configuration>
        <components>
            <component>com.speedment.connector.h2.H2Bundle</component>
        </components>
    </configuration>
</plugin>
Setting Component Parameters
Some Componens can be configured directly using the POM file. This is done using a <parameter> tag as shown below:
<plugin>
    <groupId>com.speedment</groupId>
    <artifactId>speedment-maven-plugin</artifactId>
    <version>${speedment.version}</version>
    <configuration>
        <parameters>
            <parameter>
                <name>someParameterName</name>
                <value>someParameterValue</value>
            </parameter>
        </parameters>
    </configuration>
</plugin>
Check the documentation for the individual Components to see what parameters can be set.
Disable Clear-Before-Generate
The default behvaiour in speedment-maven-plugin is that previously generated files are always removed before new ones are generated. To disable this behaviour, you can set the skipClear option either in the speedment.properties-file or as a parameter in the Maven plugin.
Using speedment.properties
skipClear=true
*Using property in pom.xml
    <build>
        <plugins>
            <plugin>
                <groupId>com.speedment</groupId>
                <artifactId>speedment-maven-plugin</artifactId>
                <version>${speedment.version}</version>
                <configuration>
                    <parameters>
                        <parameter>
                            <name>skipClear</name>
                            <value>true</name>
                        </parameter>
                    </parameters>
                </configuration>
            </plugin>
        </plugins>
    </build>
Calling the Maven target mvn speedment:clear will still clear everything, even if the skipClear property is set to true.
Setting Other Plugin POM Parameters
A number of Plugin parameters can be set in the POM file as shown in this table:
| Name | Type | Purpose | Example |
|---|---|---|---|
| debug | boolean | Enables debug mode for the plugin | true |
| dbms.type | String | MySQL, MariaDB, PostgreSQL, Oracle, DB2, SQLServer, etc | MySQL |
| dbms.host | String | Sets the dbms host name (or IP-address) | 192.168.0.4 |
| dbms.port | int | Sets the dbms port | 3306 |
| dbms.schemas | String | Schemas to reload from (comma separated) | employees,sakila |
| dbms.username | String | Sets the dbms username | john.smith |
| dbms.password | String | Sets the dbms password | W8kAk2H!Eh |
| configLocation | String | Sets the location of the configuration file | src/main/json/my_config.json |
| parameters | ConfigParam[] | Additional parameters to inject into Speedment classes | <licenseKey></licenseKey> |
| typeMappers | Mapper[] | Additional typeMappers to use with tool and generate |
<typeMapper></typeMapper> |
| components | String[] | Adds one or several components or bundles to the plugin | com.company.MyComponent |
| configFile | String | Specify a custom location for the speedment.properties-file |
<typeMapper></typeMapper> |
Here is an example that sets a number of database parameters for the plugins.
    <build>
        <plugins>
            <plugin>
                <groupId>com.speedment</groupId>
                <artifactId>speedment-maven-plugin</artifactId>
                <version>${speedment.version}</version>
                <configuration>
                    <dbmsHost>92.168.0.4</dbmsHost>
                    <dbmsPort>3306</dbmsPort>
                    <dbmsUsername>john.smith</dbmsUsername>
                </configuration>
            </plugin>
        </plugins>
    </build>
Automated Maven Builds
Automated builds can save time and enables continues integration on our projects. Mven can be instructed to generate code for you automatically on each build by attaching the plugin to certain goals like this:
<plugin>
    <groupId>com.speedment</groupId>
    <artifactId>speedment-maven-plugin</artifactId>
    <version>${speedment.version}</version>
    <executions>
        <execution>
            <id>Generate code automatically</id>
            <goals>
                <goal>generate</goal>
            </goals>
        </execution>
    </executions>
</plugin>
Now, all Speedment code will be generated automatically for you upon re-build.
To perform an automatic reload (and merge potential changes in the database structure with our JSON configuration file) and then re-generate code, do this:
    <plugin>
        <groupId>com.speedment</groupId>
        <artifactId>speedment-maven-plugin</artifactId>
        <version>${speedment.version}</version>
        <dependencies>
            <dependency>
                <groupId>mysql</groupId>
                <artifactId>mysql-connector-java</artifactId>
                <version>5.1.40</version>
            </dependency>
        </dependencies>
        <configuration>
            <dbmsPassword>mySecretPassword</dbmsPassword>
        </configuration>
        <executions>
            <execution>
                <id>Merge database schema updates with the json config file</id>
                <phase>generate-sources</phase>
                <goals>
                    <goal>reload</goal>
                </goals>
            </execution>
            <execution>
                <id>Generate code</id>
                <phase>generate-sources</phase>
                <goals>
                    <goal>generate</goal>
                </goals>
            </execution>
        </executions>
    </plugin>
This way, each time you rebuild, the code will always reflect the current database structure.
Using target/generated-sources
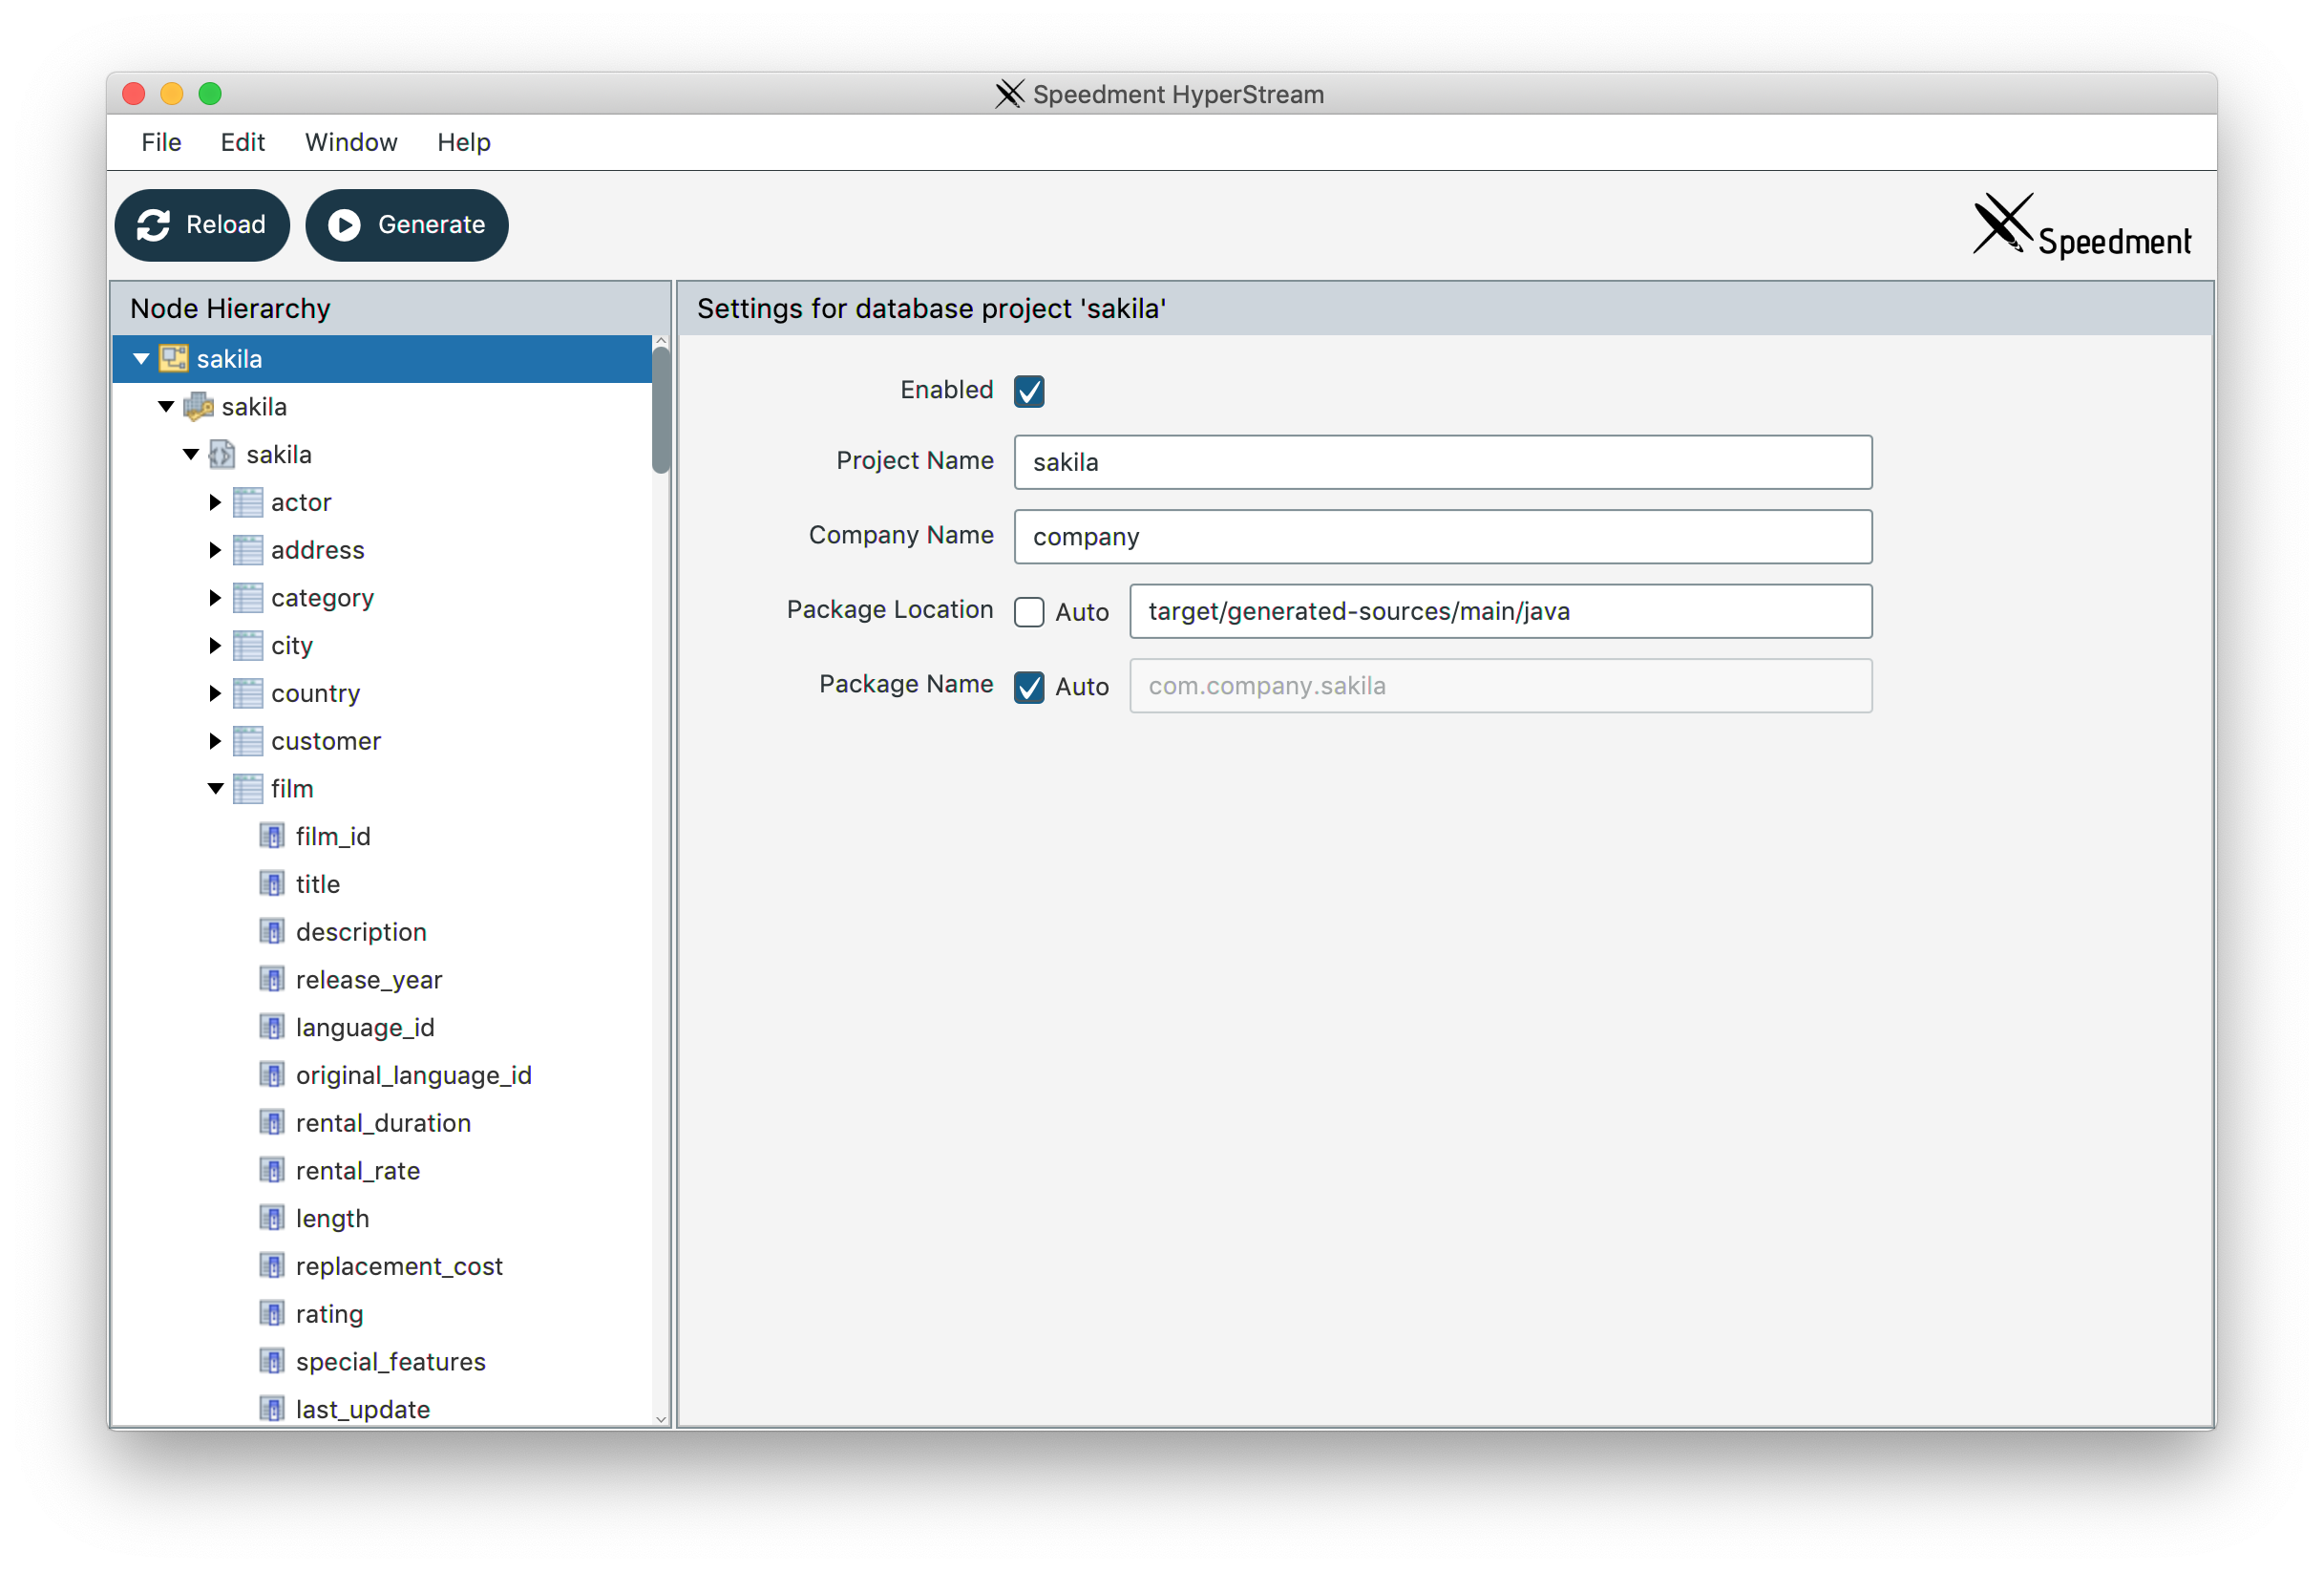
If you have an automated build, you might not want the generated code to sit in the same folder as all your other code. A common convention for these situations are to generate the code into the target/generated-sources/-folder. Most IDEs scan this folder automatically so you will still have access to the in-IDE documentation, but you have a clear separation between generated and hand-written code.
To tell Speedment to generate all code into the target/generated-sources/-folder, open the Speedment tool and change the Package Location like this. Note that you might have to uncheck Auto when you switch from a default option to a custom one.
You can also change this without launching the tool by setting the property packageLocation directly in the Maven Plugin.
    <build>
        <plugins>
            <plugin>
                <groupId>com.speedment</groupId>
                <artifactId>speedment-maven-plugin</artifactId>
                <version>${speedment.version}</version>
                <configuration>
                    <packageLocation>target/generated-sources/</packageLocation>
                </configuration>
            </plugin>
        </plugins>
    </build>
Speedment HyperStream
Speedment HyperStream is configured the same way except that you have to use different group and artifact ids. Here is an example of a Speedment HyperStream plugin definition:
<plugin>
    <groupId>com.speedment.enterprise</groupId>
    <artifactId>speedment-enterprise-maven-plugin</artifactId>
    <version>${speedment.enterprise.version}</version>
    <configuration>
        <parameters>
            <parameter>
                <name>licenseKey</name>
                <value>${speedment.licenseKey}</value>
            </parameter>
        </parameters>
    </configuration>
    <executions>
        <execution>
            <id>Generate code for Oracle</id>
            <goals>
                <goal>generate</goal>
            </goals>
        </execution>
    </executions>
</plugin>
${speedment.licenseKey} is nescessary to use the plugin.
The Speedment HyperStream Maven Plugin works the same way as the Speedment Maven Plugin but the plugins come with more Components and Bundles pre-installed.
License Keys
Speedment HyperStream requires a valid License Key to be used. The key must be available for both the Tool and the Runtime for you to be able to build and run the application.
There are two ways to enter a license key. The easiest way is to specify it as a string to both the tool (as a Maven tag) and in the ApplicationBuilder in your application. Here is an example of that:
pom.xml
<plugin>
    <groupId>com.speedment.enterprise</groupId>
    <artifactId>speedment-enterprise-maven-plugin</artifactId>
    <version>${speedment.enterprise.version}</version>
    <configuration>
        <parameters>
            <parameter>
                <name>licenseKey</name>
                <value>${speedment.licenseKey}</value> <!-- License Key must be specified! -->
            </parameter>
        </parameters>
    </configuration>
</plugin>
Main.java
public static void main(String... param) {
  DemoApplication app = new DemoApplicationBuilder()
    .withUsername("your-dbms-username")
    .withPassword("your-dbms-password")
    .withParam("licenseKey", "(YOUR LICENSE CODE)")
    .withBundle(VirtualColumnBundle.class)
    .withBundle(DataStoreBundle.class)
    .build();

  // You are ready to go!

  app.stop();
}
If you don’t want to have your license in the code, a better way to supply it using a license file. It is a basic text-file with your license key(s) entered on separate lines. Lines that start with a #-character are considered comments and will not be parsed. You can enter multiple licenses into the file. Speedment will consider all of them to determine what products you have access to and for how long.
The location and name of the file can be supplied like this:
pom.xml
<plugin>
    <groupId>com.speedment.enterprise</groupId>
    <artifactId>speedment-enterprise-maven-plugin</artifactId>
    <version>${speedment.enterprise.version}</version>
    <configuration>
        <parameters>
            <parameter>
                <name>licensePath</name>
                <value>/opt/speedment/speedment.license</value> <!-- You need to create this file -->
            </parameter>
        </parameters>
    </configuration>
</plugin>
Main.java
public static void main(String... param) {
  DemoApplication app = new DemoApplicationBuilder()
    .withParam("licensePath", "/opt/speedment/speedment.license") // Can be absolute or relative
    .build();
}
Another way is to create a file called settings.properties in the working directory of the application and enter the licenseKey and/or the licensePath like this:
settings.properties
licensePath = /opt/speedment/speedment.license
licenseKey = YOUR LICENSE KEY!!!
The default value for licensePath is [User Home]/.speedment/.licenses. If you create that folder and file and enter your license key into it, it will be loaded automatically.
Command Line Parameters
When running the Maven targets, a number of command line parameters can be used to configure the plugins. The following command line parameters are available:
| Name | Type | Purpose | Example |
|---|---|---|---|
| -Ddebug | boolean | Enables debug mode for the plugin | true |
| -Ddbms.type | String | MySQL, MariaDB, PostgreSQL, Oracle, DB2, SQLServer, etc | MySQL |
| -Ddbms.host | String | Sets the dbms host name (or IP-address) | 192.168.0.4 |
| -Ddbms.port | int | Sets the dbms port | 3306 |
| -Ddbms.schemas | String | Schemas to reload from (comma separated) | employees,sakila |
| -Ddbms.username | String | Sets the dbms username | john.smith |
| -Ddbms.password | String | Sets the dbms password | W8kAk2H!Eh |
| -DconfigLocation | String | Sets the location of the configuration file | src/main/json/my_config.json |
| -DconfigFile | String | Specify a custom location for the speedment.properties-file |
<typeMapper></typeMapper> |
Command Line Examples
Below, a number of command line examples are shown:
Start the tool with default parameters (from the POM)
mvn speedment:tool
Start the tool in debug mode
mvn speedment:tool -Ddebug=true
Generate code directly using the default config file (JSON):
mvn speedment:generate
Generate code directly using a custom configuration file (JSON):
mvn speedment:generate -DconfigLocation=src/main/json/my_config.json
Merge changes from the database with the current configuration file without asking for password:
mvn speedment:reload -DdbmsPassword=W8kAk2H!Eh
The Configuration File
Speedment stores the configuration of the database metadata in a special JSON file that, by default, is located in the file src/main/json/speedment.json
The Tool’s purpose is basically to maintain this file and to generate code. Manual changes to the file can be done and the changes will immediately affect the plugins and how code is generate, once the plugins are started.
Specifying a Configuration File
See Command Line Parameters for information on how to specify a custom configuration file.
Resetting the Configuration File
If the configuration file is removed, the Tool will be reset and you can start all over with a clean sheet.
Questions and Discussion
If you have any question, don’t hesitate to reach out to the Speedment developers on Gitter.