About
Most databases are organized in a normalized form, meaning that they are divided into small tables with distinct purposes. This is a good practise when designing relational databases, but usually not how you actually use the data in your application. To get the data in a denormalized form, you usually write a complex SQL query with multiple JOIN-statements, gathering data from multiple tables. In Speedment Enterprise however, you don’t need to write any JOINs since it comes with a functinality called Virtual Columns that takes care of this.
A Virtual Column appears just like any other Column in the generated code, except that it actually pulls data from a different location, potentially changing its form and name to better suit how it is to be consumed in the application. Virtual Columns are very powerful combined with the Speedment Enterprise Datastore since the data can be denormlized when it is loaded from the database, instead of every time the data is queried.
Integration
To include the Enterprise Virtual Columns Plugin in your Speedment project, add the following dependency:
<dependency>
    <groupId>com.speedment.enterprise</groupId>
    <artifactId>virtualcolumn-runtime</artifactId>
    <version>${speedment.version}</version>
</dependency>
You also need to add it as a <component> to the speedment-enterprise-maven-plugin so that the UI can show the added functionality.
<build>
  <plugins>
    <plugin>
      <groupId>com.speedment.enterprise</groupId>
      <artifactId>speedment-enterprise-maven-plugin</artifactId>
      <version>${speedment.version}</version>

      <configuration>
        <components>
          <component>com.speedment.enterprise.virtualcolumn.tool.VirtualColumnToolBundle</component>
        </components>
      </configuration>
    </plugin>
  </plugins>
</build>
To activate the plugin in the code, simply add the plugin bundle class to the Speedment Application Builder:
public static void main(String... args) {
    final SakilaApplication app = new SakilaApplicationBuilder()
        .withBundle(VirtualColumnBundle.class) // Order is important!
        .withBundle(InMemoryBundle.class)     // <-- Only if Datastore is used
        .withUsername("")
        .withPassword("")
        .build();
    ...
}
VirtualColumnBundle must come before InMemoryBundle if both are to be used!Usage
A virtual column is created by right-clicking on a table in the Speedment UI and selecting “Add Virtual Column” in the drop-down menu. This should be done on the most commonly linked table (a table from which many other tables can be accessed using foreign keys).
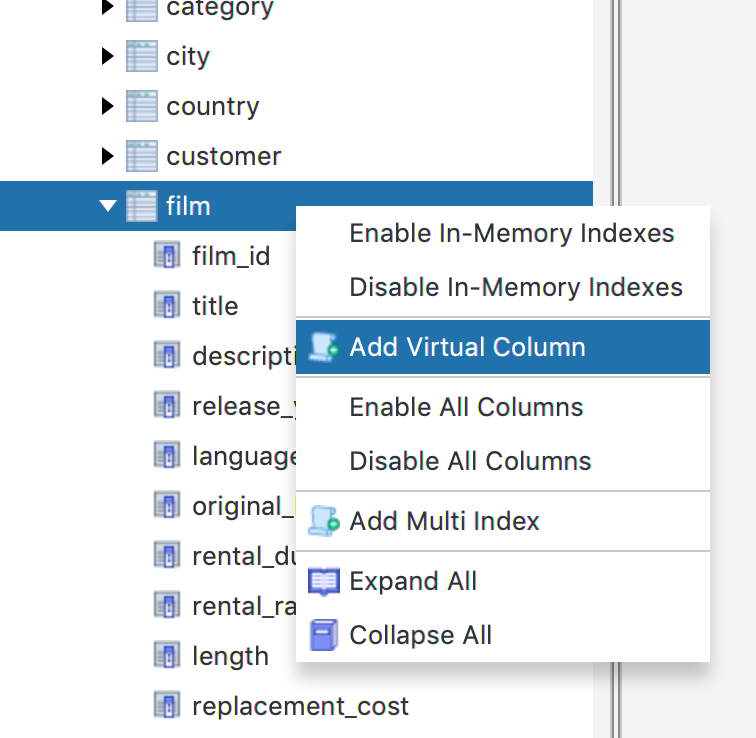
When the virtual column has been created, it appears in the tree, below all other nodes in that table. If ther are many columns, it might be necessary to scroll down to see it. When the newly created virtual column is selected in the tree, its configuration options will show up on the right.

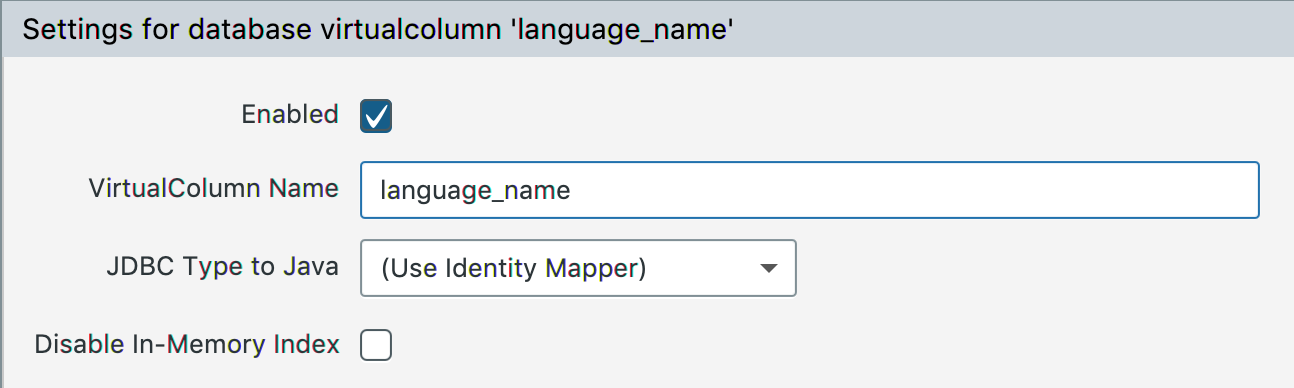
A Source Table and Source Column must be specified so that Speedment knows where to load the data from. Below these two fields is a third option called Source Path. Normally this only has one valid alternative, but if you have multiple foreign keys to the same table, you might need to specify which route through the foreign key graph Speedment should take.
The last thing to configure is the name of the virtual column. By default, Speedment will name it something like “Virtual Column 1”. To change this name, right-click on the disabled “VirtualColumn Name” textfield and click “Enable editing”. A custom name can now be entered for it.
Repeat this process for every remote column you would like to access in the same query. When the code is regenerated, the virtual columns will show up in the entity just like any ordinary column.
Selecting a Root Table
A common mistake when setting up virtual columns is that they are placed on the wrong table. For them to work as intended, they need to have many-to-one or one-to-one relationships with other tables, not one-to-many. If there are one-to-many relationships in the table, you probably need to select another table as the root.`
Explicit Join Modeling
Starting with version 3.2.10, users are able to explicitly model the Joins used to retrieve their Virtual Columns, allowing them to bypass some of the restrictions tied with the automatic path generation. To do so, some modifications to the speedment.json file are required.
The speedment.json represents your database as a tree with the following format: dbmses.schemas.tables. If your table has Virtual Columns attached to it, a virtualColumns array will be present inside of that table object. Every element inside of that array represent your Virtual Columns. To explicitly model the Join for a Virtual Column, two new objects must be added to that Virtual Column element - joinTarget and joinModel.
The joinTarget object represents the column that will be included in the query and has the following format:
"joinTarget": {
  "name" : "db.tableA.columnA",
  "schemaName" : "db",
  "tableName" : "tableA",
  "columnName" : "columnA"
}
The joinModel array is more complex as it contains the actual information needed to model the Join. Entries in the joinModel array have the following format:
"joinModel": [
  {
    "condition": {
      "leftReference": {
        "name" : "db.tableB.columnB",
        "schemaName" : "db",
        "tableName" : "tableB",
        "columnName" : "columnB"
      },
      "conditionType": "EQUALS",
      "rightReference": {
        "name" : "db.tableA.columnA",
        "schemaName" : "db",
        "tableName" : "tableA",
        "columnName" : "columnA"
      }
    }
  }
]
The condition object is the only required object in a Join Model entry needed to construct a correct Join and it contains the following components:
- leftReference - the left-hand side of the Join condition; must be an existing column in the table you are referencing
- conditionType - the condition type used in the Join (
EQUALS,NOT_EQUALS,GREATER_THAN,GREATER_OR_EQUAL,LESS_THAN,LESS_OR_EQUAL) - rightReference - the right-hand side of the Join condtion; must be an existing column in the table you are referencing
The Join Model above would result in the following Join:
LEFT JOIN db.tableA ON db.tableB.columnB = db.tableA.columnA
The number of Join Model entries you can add is not limited by Speedment.
Additional conditions
With the new explicit Join modeling, tables can be joined on multiple columns. This can be achieved by adding a additionalCondtions array inside of a Join Model entry:
"joinModel": [
  {
    "condition": {
      "leftReference": {
        "name" : "db.tableB.columnB",
        "schemaName" : "db",
        "tableName" : "tableB",
        "columnName" : "columnB"
      },
      "conditionType": "EQUALS",
      "rightReference": {
        "name" : "db.tableA.columnA",
        "schemaName" : "db",
        "tableName" : "tableA",
        "columnName" : "columnA"
      }
    },
    "additionalConditions": [
      {
        "conditionLink": "AND",
        "condition": {
          "leftReference": {
            "name": "db.tableB.columnB",
            "schemaName": "db",
            "tableName": "tableB",
            "columnName": "columnB"
          },
          "conditionType": "NOT_EQUALS",
          "rightReference": {
            "name": "db.tableA.columnC",
            "schemaName": "db",
            "tableName": "tableA",
            "columnName": "columnC"
          }
        }
      }
    ]
  }
]
Every additional condition entry consists of 2 components:
- conditionLink - the logical condition that will link the additional condition to the previous one (
AND,OR) - condition - the actual condition; same format as the condition in the Join Model entry
The Join Model above would result in the following Join:
LEFT JOIN db.tableA ON db.tableb.columnB = db.tableA.columnA AND db.tableB.columnB <> db.tableA.columnC
The number of additional conditions you can add is not limited by Speedment.
Questions and Discussion
If you have any question, don’t hesitate to reach out to the Speedment developers on Gitter.